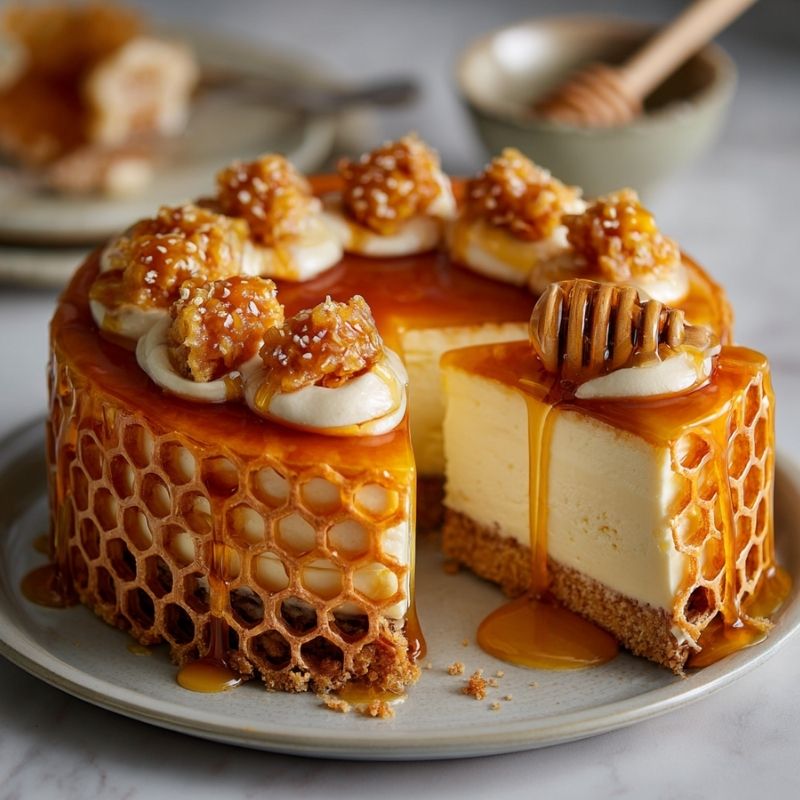
Velvety Honeycomb Cheesecake Cake
Last winter, I hosted a small birthday dinner for my husband, and instead of the usual chocolate cake he loves, I decided to experiment with something unexpected. I wanted a dessert that felt both celebratory and playful but also had a touch of sophistication.
While flipping through my old recipe notes, I stumbled across a scribbled page that simply said, “honeycomb + cheesecake + cake = magic.” It was like a challenge from my past self.
That night, I rolled up my sleeves and got to work. The first attempt wasn’t perfect—the honeycomb stuck stubbornly to the pan, and the cheesecake layer cracked—but oh, the flavors! The sweet crunch of honeycomb candy melting into the creamy cheesecake, layered between tender vanilla cake, felt like a revelation. The kids were wide-eyed, picking off shards of honeycomb like treasure, while the adults quietly savored each bite.
Over time, I refined the process: adjusting oven times, making sure the honeycomb stayed crisp, and learning just how much cream cheese made the filling lush without being heavy.
Now, this cake is the one I bring to family gatherings when I want a showstopper that still feels homey. It has become my “ta-da” dessert, the kind that earns both gasps and requests for seconds.
Short Description
A luscious layer cake with moist vanilla sponge, creamy cheesecake filling, and a golden crown of crackly honeycomb candy. It’s indulgent, eye-catching, and guaranteed to impress at any celebration.
Key Ingredients
For the Cake Layers
- 1 ½ cups all-purpose flour
- 1 cup sugar
- 1 tsp baking powder
- ½ tsp baking soda
- ½ cup unsalted butter (softened)
- 2 eggs
- 1 tsp vanilla extract
- ½ cup milk
For the Cheesecake Layer
- 2 cups cream cheese (softened)
- ¾ cup sugar
- 2 eggs
- 1 tsp vanilla extract
- ½ cup heavy cream
For the Honeycomb Topping
- 1 cup sugar
- ¼ cup honey
- ¼ cup water
- 2 tsp baking soda
Tools Needed
- 9-inch round cake pans (at least 3)
- Hand mixer or stand mixer
- Mixing bowls
- Saucepan
- Candy thermometer
- Whisk and spatula
- Parchment paper
Cooking Instructions
Step 1: Bake the Cake Layers
Preheat oven to 350°F (175°C). Grease and line two 9-inch cake pans with parchment. In a large bowl, cream together butter and sugar until fluffy. Beat in eggs one at a time, then stir in vanilla. Whisk flour, baking powder, and baking soda in a separate bowl.
Add dry ingredients alternately with milk, beginning and ending with flour, mixing until smooth. Divide batter evenly and bake for 25–28 minutes, or until a toothpick comes out clean. Cool completely.
Step 2: Make the Cheesecake Layer
Lower oven temperature to 325°F (160°C). Grease and line another 9-inch pan. Beat cream cheese until smooth. Add sugar, then eggs one at a time, followed by vanilla and cream.
Pour into the prepared pan and bake 35–40 minutes, until edges are set but the center still jiggles slightly. Cool fully, then chill at least 2 hours.
Step 3: Prepare the Honeycomb
Line a baking sheet with parchment. In a saucepan, combine sugar, honey, and water. Heat over medium-high until golden amber, around 300°F (150°C) on a candy thermometer.
Remove from heat, quickly whisk in baking soda (the mixture will foam dramatically). Pour immediately onto the parchment and let cool until hardened. Break into shards.
Step 4: Assemble the Cake
Layer one cake round on a plate, then spread with a thin layer of cream or frosting if desired. Gently place the cheesecake layer on top, followed by the second cake round. Chill for 30 minutes to help everything set. Just before serving, crown the cake with generous shards of honeycomb.
Troubleshooting tip: If the cheesecake cracks, don’t worry—the cake layers and honeycomb will cover it beautifully. If honeycomb gets sticky, store it in an airtight container with parchment between layers until ready to use.
Why You’ll Love This Recipe
Unique Texture: Crunchy honeycomb meets creamy cheesecake and soft sponge.
Showstopper Appeal: It looks bakery-worthy but is doable at home.
Sweet and Balanced: Honey’s floral notes balance the tang of cream cheese.
Family-Friendly: Kids love the honeycomb topping, while adults appreciate the sophisticated layers.
Make-Ahead Friendly: Each component can be baked in advance and assembled later.
Mistakes to Avoid & Solutions
Overbaking cheesecake: Leads to dryness and cracks.
Solution: remove when slightly wobbly in the center.
Sticky honeycomb: Humidity makes it melt.
Solution: store in an airtight container with parchment.
Uneven cake layers: Batter may not be divided evenly.
Solution: weigh pans for accuracy.
Cheesecake sinking in the middle: Often caused by sudden cooling.
Solution: let it cool gradually in the oven with the door cracked open.
Honeycomb burning: Sugar can go from golden to burnt in seconds.
Solution: watch closely and remove from heat immediately at amber color.
Serving and Pairing Suggestions
Slice generously and serve as a dessert centerpiece.
Pair with a cup of coffee or black tea to balance the sweetness.
For parties, serve plated with a drizzle of caramel sauce.
As a buffet dessert, cut into small squares for bite-sized indulgence.
Storage and Reheating Tips
Store assembled cake in the fridge for up to 3 days.
Keep honeycomb separate until serving to maintain crunch.
For leftovers, cover slices tightly with plastic wrap.
Reheating isn’t needed, but bring to room temperature for best texture.
FAQs
1. Can I make the honeycomb in advance?
Yes, up to 2 days ahead, but store in an airtight container to prevent stickiness.
2. Can I freeze the cheesecake layer?
Absolutely. Wrap tightly in plastic and freeze up to 1 month. Thaw overnight in the fridge.
3. Do I need a candy thermometer for honeycomb?
It’s highly recommended for accuracy, but you can also go by color—look for a deep golden amber.
4. What frosting goes best with this cake?
A light whipped cream or mascarpone frosting works beautifully, but it’s optional.
5. How do I prevent my honeycomb from deflating?
Work quickly after adding baking soda and don’t stir too much. Pour immediately onto parchment.
Tips & Tricks
Chill the cheesecake layer before assembly to keep it firm.
Use a hot knife to cut clean slices through all layers.
Make extra honeycomb—half will mysteriously “disappear” as snacks.
Drizzle melted chocolate over honeycomb for a richer flavor.
Add a pinch of sea salt to the honeycomb for a sweet-salty edge.
Recipe Variations
Chocolate Cake Base: Swap vanilla sponge for chocolate layers for a richer dessert.
Citrus Twist: Add zest of one lemon or orange to the cake batter for brightness.
Salted Caramel Honeycomb: Stir in ½ tsp sea salt to the honey mixture before it sets.
Mini Versions: Bake the cheesecake in muffin tins and layer with cupcake-sized cakes for personal servings.
Nutty Honeycomb: Sprinkle toasted almonds over the honeycomb while it cools for extra crunch.
Final Thoughts
This honeycomb cheesecake cake isn’t just dessert—it’s an experience. The contrast of textures makes every bite surprising, while the balance of creamy, crunchy, and tender layers keeps you coming back for more. What I love most is how it looks like something from a pastry shop window, yet it comes together in my kitchen with just a little patience and care.
The honeycomb has its own magic, foaming up dramatically in the pan before hardening into golden sheets that crack like glass. It’s the kind of recipe that feels alive, interactive, and just plain fun. And when the cheesecake and cake come together, you get a dessert that’s both whimsical and elegant.
This is the cake I turn to when I want to wow a table full of guests or treat my family to something beyond the ordinary. It’s indulgent, yes, but in the best way—a dessert worth every step, and every crumb.
Velvety Honeycomb Cheesecake Cake
Course: DessertDifficulty: Easy10
servings35
minutes1
hour20
minutes2
hoursA luscious layer cake with moist vanilla sponge, creamy cheesecake filling, and a golden crown of crackly honeycomb candy. It’s indulgent, eye-catching, and guaranteed to impress at any celebration.
Ingredients
- For the Cake Layers
1 ½ cups all-purpose flour
1 cup sugar
1 tsp baking powder
½ tsp baking soda
½ cup unsalted butter (softened)
2 eggs
1 tsp vanilla extract
½ cup milk
- For the Cheesecake Layer
2 cups cream cheese (softened)
¾ cup sugar
2 eggs
1 tsp vanilla extract
½ cup heavy cream
- For the Honeycomb Topping
1 cup sugar
¼ cup honey
¼ cup water
2 tsp baking soda
Directions
- Preheat oven to 350°F (175°C). Grease and line two 9-inch cake pans. Cream butter and sugar until fluffy, then beat in eggs and vanilla. Whisk flour, baking powder, and baking soda in another bowl.
- Add dry ingredients alternately with milk, starting and ending with flour. Divide into pans and bake 25–28 minutes, until a toothpick comes out clean. Cool completely.
- Lower oven to 325°F (160°C) and grease another 9-inch pan. Beat cream cheese until smooth, then add sugar, eggs, vanilla, and cream. Bake 35–40 minutes, until edges are set but the center jiggles slightly. Cool fully, then chill for at least 2 hours.
- Line a baking sheet with parchment. Heat sugar, honey, and water in a saucepan until golden amber, about 300°F (150°C). Remove from heat and quickly whisk in baking soda. Pour onto parchment and let harden, then break into shards.
- Place one cake round on a plate and spread with a thin layer of cream or frosting. Add the cheesecake layer, then the second cake round. Chill for 30 minutes, then top with honeycomb shards before serving.