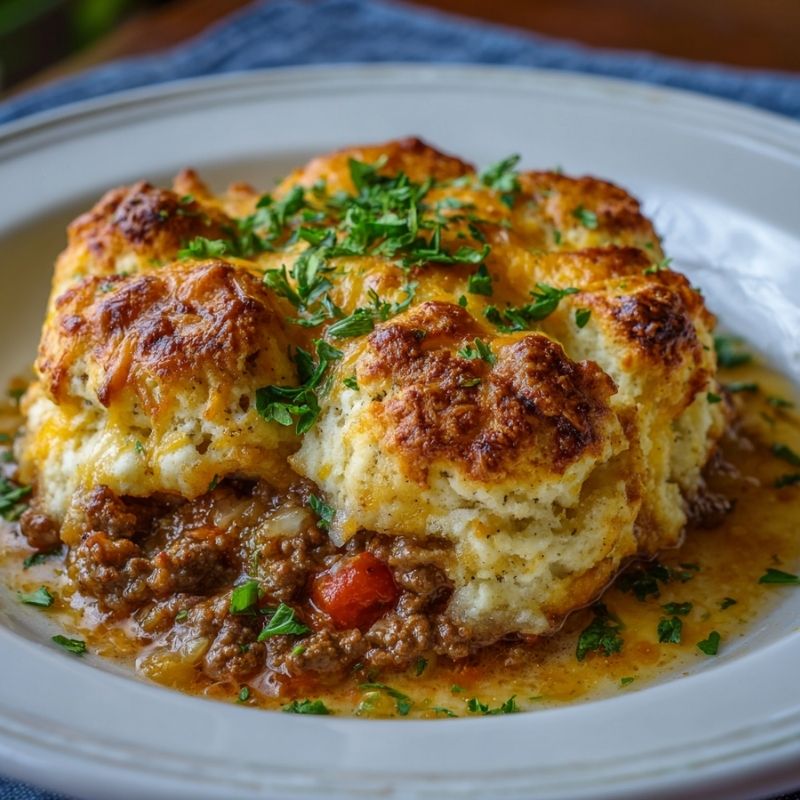
Flavorful Cheddar Bay Ground Beef Cobbler
One of my favorite food memories happened on a cool autumn evening when I stumbled upon a tiny street stall tucked into a side alley of a local market. The vendor was serving something that looked like a cross between a meat pie and a biscuit casserole. The smell was irresistible—savory beef simmering with onions, a hint of garlic, and the comforting aroma of buttery dough rising on top. People were lined up, and I joined without hesitation.
When I finally got my portion, it was pure comfort in a paper bowl. The beef was rich and hearty, the vegetables soft and sweet, and the biscuit topping golden with just the right crunch. I carried it home that night, determined to recreate the experience in my own kitchen.
That little stall reminded me how street food often captures flavors that are unfussy but unforgettable. It inspired this Cheddar Bay Ground Beef Cobbler recipe, which feels like a hug in a dish. Unlike the stall version, mine gets a cheesy upgrade with sharp cheddar in the biscuit topping, making every bite even more indulgent. It’s a recipe I now make when my family craves comfort food without the fuss of rolling dough or layering crusts.
This dish is warm, satisfying, and perfect for anyone who wants a homey dinner that doesn’t skimp on flavor. And while it’s hearty enough for colder days, it’s also a crowd-pleaser for gatherings, potlucks, or nights when you want something filling yet easy.
Short Description
Cheddar Bay Ground Beef Cobbler combines savory beef, vegetables, and a cheesy biscuit topping baked to golden perfection. It’s a comforting, all-in-one dinner that’s both hearty and simple to make.
Key Ingredients
- 1 lb lean ground beef
- 1 cup sharp cheddar cheese, shredded
- 1 medium onion, chopped
- 2 cloves garlic, minced
- 2 cups frozen mixed vegetables
- 2 cups Bisquick mix
- ¾ cup whole milk
- 1 cup low-sodium beef broth
- 1 tbsp Worcestershire sauce
- Salt and pepper to taste
Tools Needed
- Large skillet
- Mixing bowls
- Wooden spoon or spatula
- 9×13-inch baking dish
- Oven
Cooking Instructions
Step 1: Preheat the Oven
Preheat oven to 375°F (190°C). Grease a baking dish to prevent sticking.
Step 2: Sauté Aromatics
In a large skillet over medium heat, cook onions and garlic until softened and fragrant, about 2–3 minutes.
Step 3: Cook the Beef
Add ground beef to the skillet, breaking it apart with a spoon. Cook until browned and no pink remains.
Step 4: Add Vegetables and Seasoning
Stir in frozen vegetables, Worcestershire sauce, salt, and pepper. Cook for 2–3 minutes until heated through.
Step 5: Simmer with Broth
Pour in beef broth and let the mixture simmer for 5 minutes. It should thicken slightly into a savory filling.
Step 6: Prepare Biscuit Topping
In a separate bowl, combine Bisquick mix, milk, and cheddar cheese. Stir until thick but pourable. If too runny, add 1 tbsp of Bisquick at a time; if too dry, add a splash of milk.
Step 7: Assemble and Bake
Pour the beef mixture into the greased baking dish. Spoon biscuit batter evenly over the top. Bake for 25–30 minutes, or until biscuits are golden brown and slightly crisp.
Step 8: Rest and Serve
Let the cobbler rest for 5 minutes before serving to allow the filling to settle.
Why You’ll Love This Recipe
Comfort Food Classic: Hearty beef and fluffy cheddar biscuits bring warmth to every bite.
One-Pan Convenience: Meat, veggies, and bread all bake together for an easy complete meal.
Family-Friendly: Both adults and kids love its savory flavor and cheesy topping.
Budget-Friendly: Uses simple, affordable pantry staples and stretches easily to feed a crowd.
Mistakes to Avoid & Solutions
Watery Filling: If the beef mixture looks too thin, simmer a few extra minutes until it thickens.
Overmixing Biscuit Batter: Stir gently; overmixing makes the biscuits dense instead of fluffy.
Undercooked Biscuits: If the top browns too fast but the center is raw, cover loosely with foil and continue baking.
Too Salty: Use low-sodium broth and adjust salt at the end for balance.
Vegetables Too Soft: Don’t overcook before baking—the oven will finish the job.
Serving and Pairing Suggestions
For family-style meals, place the baking dish on the table and let everyone scoop out their own portion.
Serve as a main dish with a fresh green salad or roasted asparagus.
Pair with iced tea, sparkling water, or a light red wine like Pinot Noir.
Storage and Reheating Tips
Store leftovers in an airtight container in the fridge for up to 3 days.
Reheat in the oven at 350°F for 10–15 minutes for best texture.
Microwave single portions for 1–2 minutes, though the biscuit topping may soften.
Freeze in portions for up to 2 months; thaw overnight in the fridge before reheating.
FAQs
1. Can I use ground turkey instead of beef?
Yes, though it will be lighter in flavor. Add extra seasoning for depth.
2. Can I use fresh vegetables instead of frozen?
Absolutely, just sauté them slightly longer before adding broth.
3. Do I need to use Bisquick?
No, you can make your own mix with flour, baking powder, and butter, but Bisquick saves time.
4. How do I know the biscuits are fully cooked?
They should be golden on top and firm in the center. Insert a toothpick, it should come out clean.
5. Can I prepare it ahead of time?
Yes, assemble the beef filling and biscuit batter separately. Refrigerate, then combine and bake fresh.
Tips & Tricks
Add a pinch of smoked paprika or chili flakes for a deeper flavor.
For a crispier topping, brush the biscuit batter with melted butter before baking.
Use sharp cheddar or even a cheddar-jack blend for extra cheesy goodness.
To make cleanup easier, cook the filling in an oven-safe skillet and bake directly in it.
Recipe Variations
Tex-Mex Style: Swap Worcestershire for taco seasoning, add black beans and corn, and top with pepper jack cheese.
Mushroom and Beef: Add 1 cup sliced mushrooms while cooking the beef for a richer flavor.
Vegetarian Version: Replace beef with lentils or crumbled plant-based meat and use vegetable broth.
Italian Twist: Add oregano, basil, and a little tomato paste to the beef mixture; sprinkle Parmesan into the biscuit topping.
Final Thoughts
This recipe is a keeper for nights when you want something filling but don’t want to fuss over multiple pots and pans. It’s the kind of meal that draws everyone to the table, spoons ready. And while it’s perfect as it is, I also love how adaptable it can be, you can play with flavors and still end up with a cobbler that feels like home.
Cooking should never feel intimidating; dishes like this prove that comfort food can be approachable, affordable, and downright delicious. If you try it, you’ll see how one skillet, a few pantry staples, and a warm oven can create magic. And maybe, just like me, you’ll find yourself remembering a simple street stall meal that sparked inspiration for years to come.
Flavorful Cheddar Bay Ground Beef Cobbler
Course: Main CourseDifficulty: Easy6
servings15
minutes30
minutesCheddar Bay Ground Beef Cobbler combines savory beef, vegetables, and a cheesy biscuit topping baked to golden perfection. It’s a comforting, all-in-one dinner that’s both hearty and simple to make.
Ingredients
1 lb lean ground beef
1 cup sharp cheddar cheese, shredded
1 medium onion, chopped
2 cloves garlic, minced
2 cups frozen mixed vegetables
2 cups Bisquick mix
¾ cup whole milk
1 cup low-sodium beef broth
1 tbsp Worcestershire sauce
Salt and pepper to taste
Directions
- Preheat oven to 375°F (190°C) and grease a baking dish.
- In a skillet over medium heat, sauté onions and garlic until soft and fragrant, about 2–3 minutes.
- Add ground beef, breaking it apart with a spoon, and cook until browned.
- Stir in frozen vegetables, Worcestershire sauce, salt, and pepper. Cook 2–3 minutes until heated through.
- Pour in beef broth and simmer 5 minutes until slightly thickened.
- In a bowl, mix Bisquick, milk, and cheddar cheese until thick but pourable. Adjust with more Bisquick if too runny or a splash of milk if too dry.
- Transfer beef mixture to baking dish. Spoon biscuit batter evenly on top and bake 25–30 minutes until biscuits are golden and crisp.
- Rest 5 minutes before serving to let the filling settle.