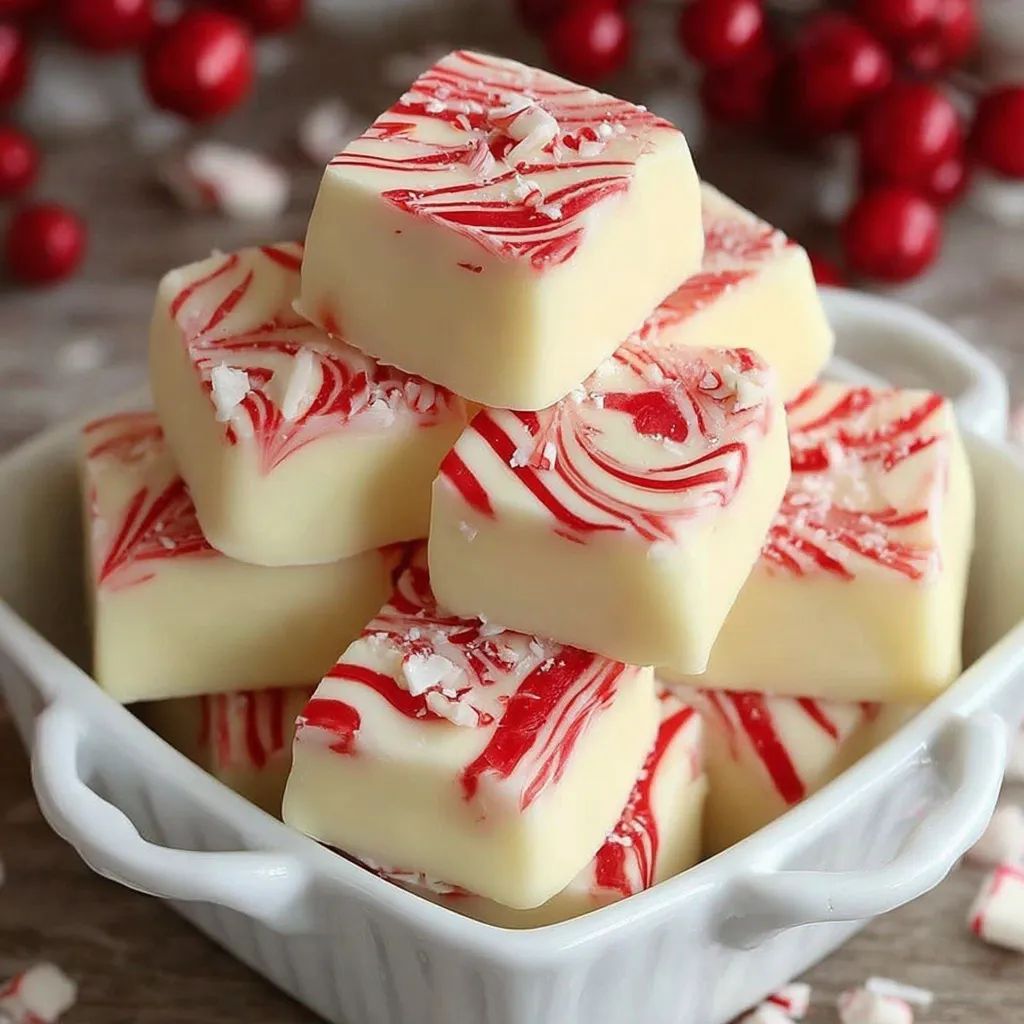
Festive Soft Christmas Peppermints
In a small-town library tucked between two sleepy streets, we held our annual December craft-and-cookie swap. There were the usual gingerbread cut-outs, reindeer cupcakes, and marshmallow-stuffed hot cocoa bombs. But it was Janice the retired postmaster with a soft spot for peppermint who set down a tin that caused everyone to pause.
“Homemade,” she smiled, revealing rows of perfectly swirled, pastel-soft Christmas peppermints. They weren’t store-bought hard disks; they were melt-in-your-mouth clouds with a whisper of coolness. I begged for the recipe. She handed me a faded index card with a peppermint-smudged corner.
The following Sunday, I invited my niece and her college roommates over. We twisted ropes of red and white dough at the kitchen counter, Christmas jazz playing, peppermint extract filling the air. One girl said it reminded her of old-fashioned candy shops her grandfather used to take her to. Another shaped hers into tiny hearts and stars. The process was equal parts therapy and tradition a sweet way to welcome December.
Soft Christmas Peppermints became part of our holiday ritual from that weekend on. You don’t need a candy thermometer or special molds. Just a handful of simple ingredients and a little time. They’re festive, tender, and carry the kind of nostalgia you can actually taste. Make them once, and they’ll likely show up at every cookie platter, gift bag, or dessert table you prepare from now through New Year’s Eve.
Short Description
These Soft Christmas Peppermints are festive, melt-in-your-mouth treats made with butter, powdered sugar, cream, and a hint of peppermint. No baking required, just twist, shape, and let dry for a nostalgic holiday candy that’s as easy as it is charming.
Key Ingredients
- ½ cup butter, softened
- 3 cups powdered sugar
- 2 tbsp heavy whipping cream
- ¼ tsp peppermint extract
- Red gel food coloring
Tools Needed
- Hand or stand mixer
- Mixing bowls
- Rubber spatula
- Parchment paper
- Sharp knife or kitchen scissors
Cooking Instructions
Step 1: Cream the Butter
In a large mixing bowl, beat the softened butter with a mixer until light, pale, and fluffy. This should take about 2–3 minutes.
Step 2: Make the Dough
Add the heavy cream, powdered sugar, and peppermint extract. Beat on low until the powdered sugar begins to incorporate, then increase speed and mix until a thick, smooth dough forms. If the mixture feels sticky, gradually add 1–2 tbsp extra powdered sugar until pliable but not dry.
Step 3: Divide and Color
Split the dough into two portions. Leave one white and tint the other with a few drops of red gel coloring, kneading gently with gloved hands until evenly pink-red.
Step 4: Shape the Mints
Roll each color into long, thin ropes. Twist the red and white together gently, then pinch off bite-size pieces. Shape them into rounds, hearts, or twists—whatever feels festive!
Step 5: Dry and Set
Place each mint on parchment paper and let air-dry for 1–2 hours for a softer finish, or up to 24 hours if you prefer a firmer chew.
Why You’ll Love This Recipe
No baking required
Only 5 simple ingredients
Kid-friendly holiday activity
Classic peppermint flavor with a soft texture
Customizable shapes and colors
Perfect for gifting or cookie trays
Mistakes to Avoid & Solutions
Using cold butter
Cold butter won’t cream properly and leads to a lumpy dough.
Solution: Make sure your butter is softened to room temperature for easy blending.
Adding too much food coloring
Over-coloring can make the dough too wet or bitter.
Solution: Use gel food coloring in small amounts and mix thoroughly before adding more.
Skipping extra powdered sugar if sticky
A sticky dough will be difficult to shape and twist.
Solution: Add 1 tablespoon of powdered sugar at a time until it’s easy to handle.
Not drying long enough
Mints will be overly soft or sticky if rushed.
Solution: Let them air-dry on parchment at least 2 hours, or overnight for best texture.
Storing before drying
Storing too early can cause condensation and make them mushy.
Solution: Always let them fully dry before placing in containers.
Serving and Pairing Suggestions
Serve as a post-meal mint at holiday dinners
Pair with hot cocoa, eggnog, or peppermint tea
Arrange on cookie platters for Christmas parties
Gift in cellophane bags tied with ribbon
Use as cake toppers or edible decorations on cupcakes
Storage and Reheating Tips
Store in an airtight container at room temperature
Keep mints layered with parchment to prevent sticking
Best enjoyed within 7–10 days
No reheating needed, just pop and enjoy
FAQs
1. Can I use a different extract instead of peppermint?
Yes! You can swap it for vanilla, almond, or lemon extract for a different twist.
2. How do I keep the colors from blending too much when twisting?
Chill the ropes slightly before twisting to reduce bleeding.
3. Can I freeze these mints?
Freezing is not recommended—moisture may change the texture once thawed.
4. Do I need to use gel food coloring?
Yes, gel gives vibrant color without adding too much liquid. Liquid food coloring may make the dough too wet.
5. Can kids help make these?
Absolutely! It’s a great family activity. Just have adults handle the mixer and kids shape the mints.
Tips & Tricks
Use gloves when kneading food coloring to avoid stained hands
Make candy canes or mini wreath shapes for extra fun
Add crushed peppermint candy on top for crunch
Use a ruler to keep ropes evenly sized before twisting
Let shaped mints rest on wire racks to air-dry more evenly
Recipe Variations
1. Chocolate Peppermint Mints
Add 1 tbsp unsweetened cocoa powder to half the dough. Roll with the white portion for a chocolate-striped twist.
2. Lemon Holiday Mints
Swap peppermint extract for lemon, and color the dough pale yellow and white. Shape into rounds and coat lightly in powdered sugar.
3. Matcha Vanilla Swirls
Replace peppermint with vanilla extract and tint one portion with matcha powder. The earthy green and creamy white create an elegant holiday mint.
4. Candy Cane Crumble Toppers
Skip the twisting. Form all mints white, then press a pinch of crushed candy cane on top before drying for a sparkly crunch.
Final Thoughts
There’s something rewarding about making a sweet treat that feels like it came out of a grandmother’s candy dish, even if you crafted it with a modern mixer and a Spotify playlist playing in the background. Soft Christmas Peppermints are the kind of holiday magic that happens when you blend memory, flavor, and just a little food coloring. Sharing these with friends, tucking them into gift boxes, or letting kids shape their own designs keeps the tradition going strong.
If you’re looking for an easy way to bring a homemade touch to the season without baking or elaborate decorating this is your sign to twist up a batch. Let them dry on your counter while snow (or rain) taps at the windows, and they’ll be ready to brighten your table before the next round of guests walk in the door.
Festive Soft Christmas Peppermints
Course: DessertDifficulty: Easy4
servings20
minutes4
hoursThese Soft Christmas Peppermints are festive, melt-in-your-mouth treats made with butter, powdered sugar, cream, and a hint of peppermint. No baking required, just twist, shape, and let dry for a nostalgic holiday candy that’s as easy as it is charming.
Ingredients
½ cup butter, softened
3 cups powdered sugar
2 tbsp heavy whipping cream
¼ tsp peppermint extract
Red gel food coloring
Directions
- Cream softened butter until light and fluffy, about 2–3 minutes.
- Add heavy cream, powdered sugar, and peppermint extract. Mix until a thick dough forms; add more powdered sugar if sticky.
- Divide dough; keep one white and tint the other red with gel coloring. Knead until color is even.
- Roll both colors into ropes, twist together, and pinch into small pieces. Shape as desired.
- Place pieces on parchment and air‑dry 1–2 hours for soft texture or up to 24 hours for firmer mints.