Dreamy Butterfinger Pie
Three thank-you pies in one week. That’s how I ended up with a countertop full of crushed candy wrappers and a new obsession: Butterfinger Pie. The first was for my neighbor’s son, who shoveled my snowy driveway in exchange for “anything with peanut butter.” The second an apology offering to my friend Leah after I bailed on her trivia night (again). And the third? A last-minute contribution to my niece’s bake sale, requested five minutes before she left for school. Each pie vanished in under an hour.
My kitchen looked like a candy store collided with a cloud of powdered sugar. I’d forgotten how joyful it is to make something that feels indulgent but doesn’t require turning on the oven. Each swirl of peanut butter and crushed candy into the cream cheese base felt a little like stirring childhood into dessert chaotic, colorful, sweet.
One afternoon, I brought a chilled slice to the park, sharing it with a couple of parents juggling toddlers and thermoses. “Wait you made this?” one dad asked, wide-eyed between bites. Yes. And you can too. Butterfinger Pie might sound like a sugar bomb, but the balance of salty peanut butter, creamy filling, and that crushed candy crunch creates something surprisingly light in texture, even if it’s rich in spirit.
The joy here isn’t just in the taste. It’s in watching someone break into a smile with their first forkful. And in knowing that you didn’t have to fuss to get there. If you’ve got 15 minutes, a mixing bowl, and a fridge this dessert has your name on it.
Short Description
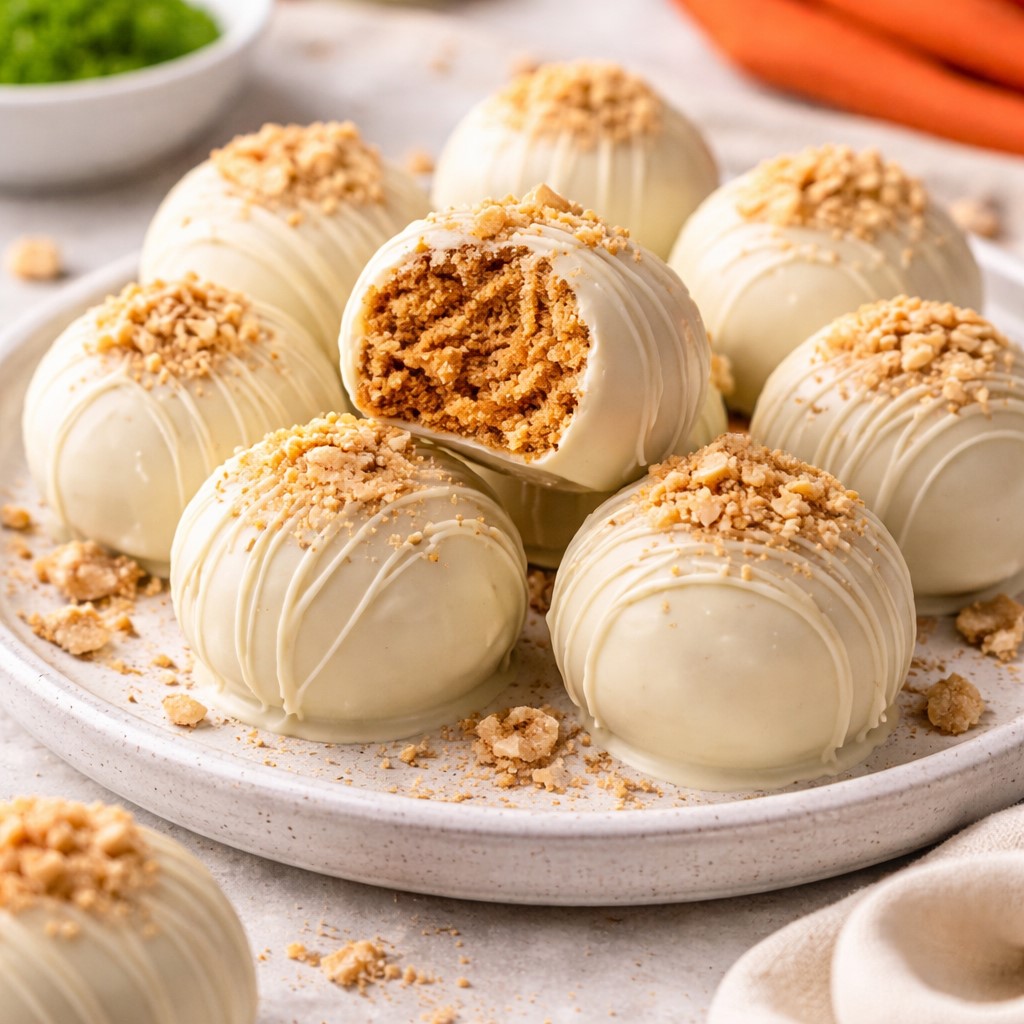
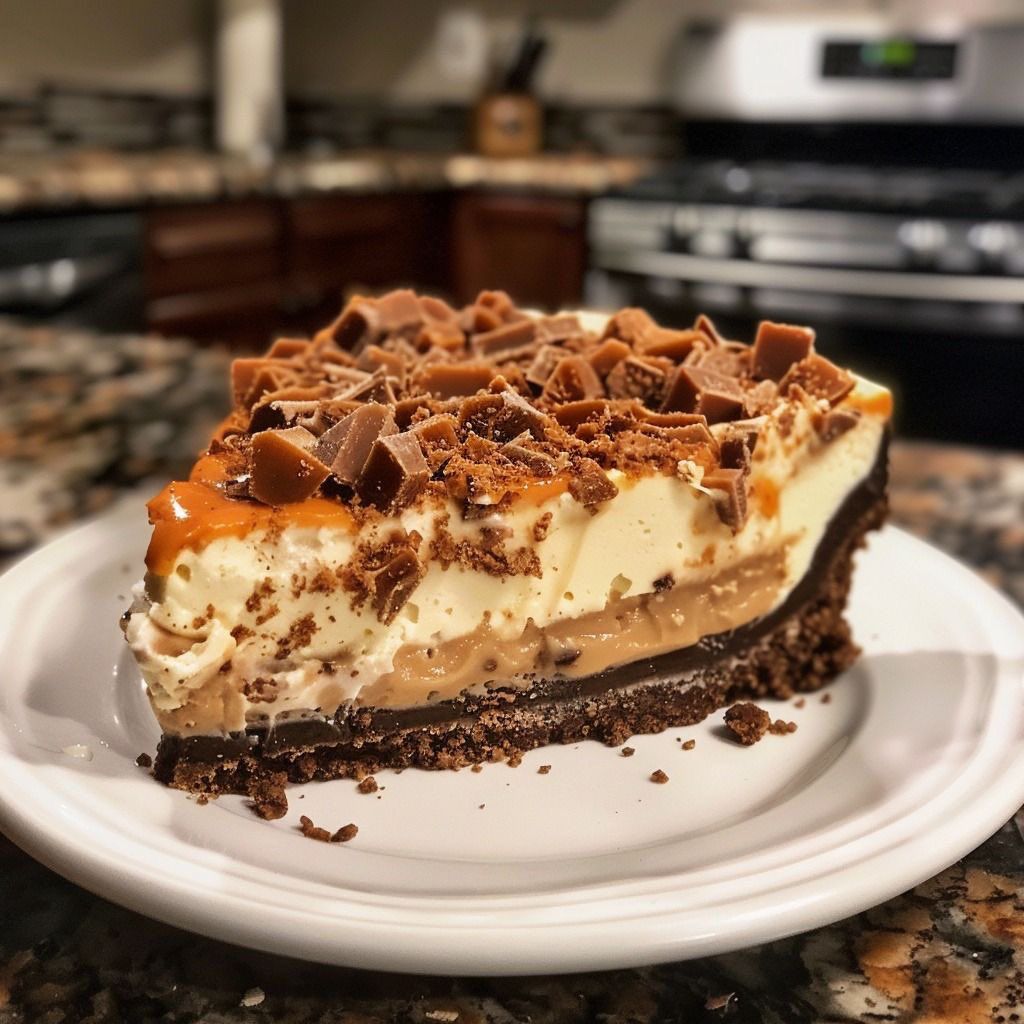
Butterfinger Pie is a no-bake dessert that combines creamy peanut butter filling, crushed Butterfinger candy bars, and a chocolate cookie crust for a nostalgic, irresistible treat.
Key Ingredients
- 1 (8-ounce) package cream cheese, room temperature
- ½ cup creamy peanut butter
- 2 teaspoons vanilla extract
- 1 ½ cups powdered sugar
- 1 (12.5-ounce) bag fun-sized Butterfinger bars, crushed (reserve 2 bars for topping)
- 1 (8-ounce) container Cool Whip, thawed
- 1 store-bought Oreo or chocolate graham cracker crust
Tools Needed
- Large mixing bowl
- Electric hand mixer or stand mixer
- Rubber spatula
- Measuring cups and spoons
- Spoon or offset spatula for spreading
- Plastic wrap or pie storage container
Cooking Instructions
Step 1: Mix the Creamy Base
In a large mixing bowl, beat together the softened cream cheese and peanut butter until completely smooth and fluffy. Add vanilla extract and continue mixing until incorporated.
Step 2: Sweeten the Filling
Gradually beat in the powdered sugar. Start at low speed to avoid a sugar cloud, then increase until fully blended. The mixture should be smooth and thick, with no lumps.
Step 3: Add the Crunch
Reserve two Butterfinger bars for topping. Fold the remaining crushed bars into the mixture using a rubber spatula. The filling will take on a golden speckled look with crunchy candy bits throughout.
Step 4: Lighten It Up
Gently fold in the thawed Cool Whip until the filling is airy and well blended. Don’t overmix you want to keep that fluffy texture.
Step 5: Fill and Finish
Spoon the filling into the prepared pie crust. Smooth the top with a spatula. Sprinkle the reserved crushed Butterfinger bars evenly over the top.
Step 6: Chill and Set
Cover and refrigerate the pie for at least 4 hours, or until firm enough to slice cleanly. Overnight chilling works great if you’re prepping ahead.
Why You’ll Love This Recipe
No oven needed perfect for summer or quick desserts
Sweet and salty flavor that pleases all ages
Only takes 15 minutes to assemble
Travels well for potlucks, parties, or bake sales
Uses pantry-friendly ingredients
Can be made a day ahead
Mistakes to Avoid & Solutions
Using cold cream cheese
Cold cream cheese won’t blend smoothly, leaving lumps in the filling.
Solution: Let the cream cheese soften at room temp for at least 30 minutes before mixing.
Overmixing the Cool Whip
This can deflate the filling and make it dense.
Solution: Fold gently with a spatula until just combined. Stop when no white streaks remain.
Skipping the chill time
Cutting into the pie too soon can lead to a runny mess.
Solution: Chill for at least 4 hours—overnight is even better for cleaner slices.
Using chunky peanut butter
This throws off the texture and makes the filling harder to mix.
Solution: Stick to creamy peanut butter for a silky-smooth base.
Crushing Butterfingers too finely
Powdery candy loses that signature crunch.
Solution: Aim for small shards and chunks for best texture contrast.
Serving and Pairing Suggestions
Serve chilled straight from the fridge with a clean, sharp knife
Top with a dollop of whipped cream or drizzle of warm chocolate sauce
Pair with iced coffee, cold brew, or a glass of almond milk
Serve plated for parties or in individual mason jars for fun presentation
Add a scoop of vanilla or chocolate ice cream for an extra indulgent touch
Storage and Reheating Tips
Store leftovers in the fridge in an airtight container for up to 4 days
Keep the pie covered to prevent it from absorbing fridge odors
Freeze individual slices on a tray, then transfer to freezer-safe bags for up to 1 month
Thaw overnight in the fridge before serving
No reheating needed this pie is best served cold
FAQs
1. Can I use homemade whipped cream instead of Cool Whip?
Yes, you can substitute 2 cups of freshly whipped cream, but make sure it’s stiff enough to hold shape.
2. Is this safe for people with nut allergies?
Unfortunately, no peanut butter is a key ingredient. You can try using sunflower seed butter for a nut-free version, but the flavor will differ.
3. Can I make this pie gluten-free?
Yes. Just be sure your crust and candy bars are certified gluten-free.
4. What’s the best way to crush Butterfingers?
Place them in a zip-top bag and gently pound with a rolling pin. Don’t grind into dust—chunks are key.
5. Can I make this ahead for a party?
Absolutely. It actually sets better overnight, making it a great make-ahead dessert.
Tips & Tricks
Wipe your knife clean between slices for neat edges
Let kids help crush the candy they’ll love it
Try warming the knife slightly for cleaner cuts
Want an extra pop? Add a pinch of sea salt on top before serving
Save leftover crushed Butterfingers for topping yogurt or ice cream
Recipe Variations
Chocolate Peanut Butter Pie
Swap out Butterfingers for chopped Reese’s. Use the same steps and crust.
Nut-Free Sunflower Pie
Use sunflower seed butter in place of peanut butter and skip the candy. Add mini chocolate chips instead.
Frozen Butterfinger Bars Pie
Freeze the crushed candy for 15 minutes before folding in—it adds a cool crunch to every bite.
Mini Pie Jars
Layer the filling into small jars with crushed chocolate cookies at the bottom. Great for grab-and-go treats.
Mocha Butterfinger Pie
Add 1 teaspoon instant espresso powder to the cream cheese mix before blending. It brings out the chocolate notes.
Final Thoughts
Butterfinger Pie came together in the middle of a wild week, between a snowstorm, a guilt trip, and a bake sale. I didn’t expect it to become a crowd-pleaser so quickly but maybe that’s what makes it so good. It’s unfussy but generous, sweet without apology.
In a season of heavy recipes and slow-bakes, this chilled slice offers relief. You get the playfulness of candy, the comfort of creamy filling, and the ease of not having to hover over an oven timer. That kind of dessert is worth bookmarking.
If your week is too busy, your fridge too full, and your sweet tooth impatient, this pie is for you. And if it wins you a thank-you, an apology, or a bake sale trophy well, let’s just say it’s earned its place in the fridge.
Dreamy Butterfinger Pie
Course: DessertDifficulty: Easy8
servings15
minutes4
hoursButterfinger Pie is a no-bake dessert that combines creamy peanut butter filling, crushed Butterfinger candy bars, and a chocolate cookie crust for a nostalgic, irresistible treat.
Ingredients
1 (8-ounce) package cream cheese, room temperature
½ cup creamy peanut butter
2 teaspoons vanilla extract
1 ½ cups powdered sugar
1 (12.5-ounce) bag fun-sized Butterfinger bars, crushed (reserve 2 bars for topping)
1 (8-ounce) container Cool Whip, thawed
1 store-bought Oreo or chocolate graham cracker crust
Directions
- Mix softened cream cheese, peanut butter, and vanilla in a large bowl until smooth and fluffy.
- Beat in powdered sugar gradually until the mixture is thick and lump-free.
- Fold in crushed Butterfingers (reserve 2 bars for topping) until evenly distributed.
- Gently fold in Cool Whip until the filling is light and airy.
- Spoon filling into the crust, smooth the top, and sprinkle reserved crushed Butterfingers.
- Cover and refrigerate for at least 4 hours, or overnight for best results