Creamy No-Bake Grinch Christmas Cheesecake
It started with a neighborhood cookie swap gone wildly competitive. Marlene, two doors down, showed up with peppermint fudge truffles wrapped in gold leaf. Across the table, Mateo brought matcha tiramisu cups served in vintage tea glasses. I needed something bold not just in flavor, but in personality. So I brought a No-Bake Grinch Christmas Cheesecake. It was bright, it was green, and it had just the right hint of mint. No one saw it coming.
Earlier that week, a class of third graders toured the community center’s kitchen for a holiday baking demo. Their only request? “Can you make something Grinchy?” That’s how the idea took root: dessert that’s playful, colorful, and easy enough to make without turning the oven on. I remember Ari, the intern, swirling the green filling like it was an art project. Every swirl looked like it had a mind of its own.
This cheesecake has since made appearances at office potlucks, church bake sales, and even on a plastic tray for a teen movie marathon. Its magic? It draws people in before they’ve even tasted it. The color is loud, the hearts are tiny and red, and the chill factor makes it ideal for when oven space is maxed out during December chaos. And the best part? No baking. Just stirring, folding, and letting the fridge do its quiet work.
Short Description
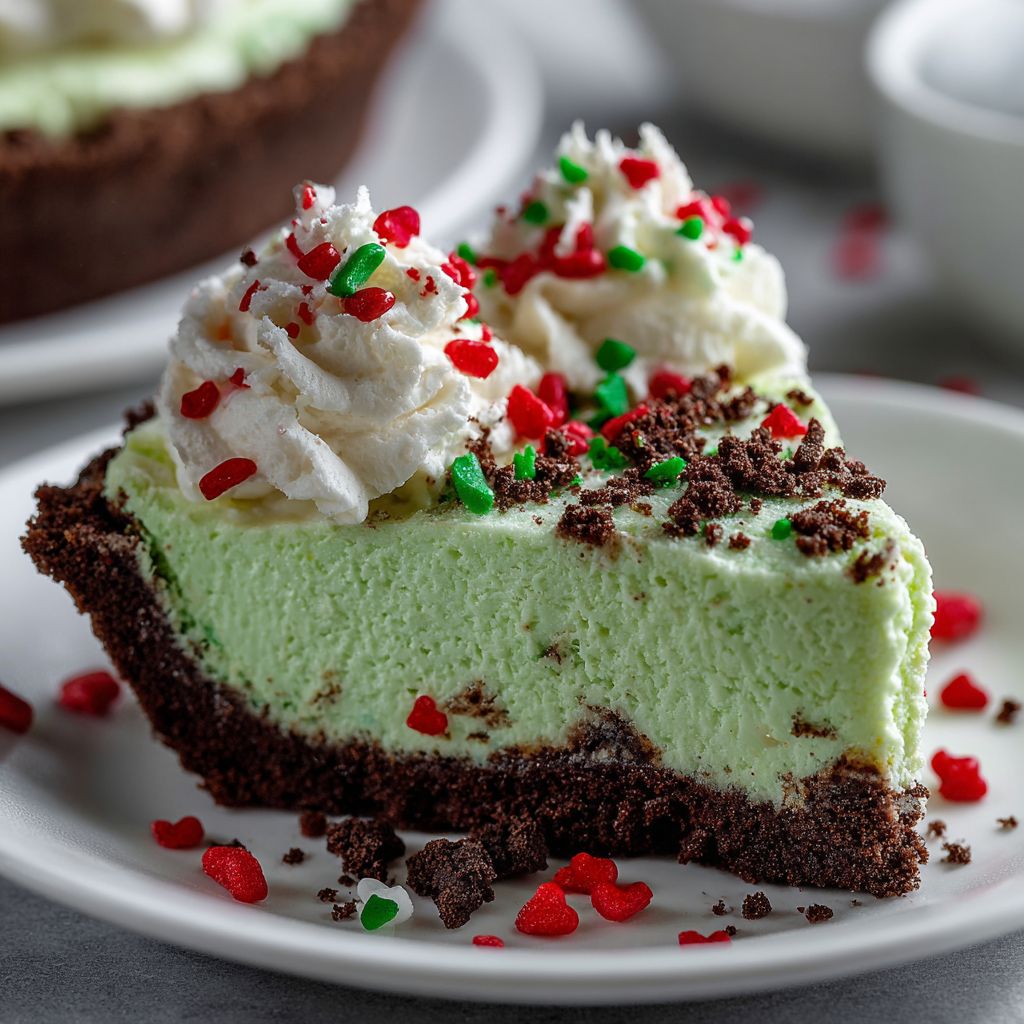
This No-Bake Grinch Christmas Cheesecake is a minty, creamy, neon-green dessert with a chocolate Oreo crust and red candy heart topping. Easy to make, festive to look at, and perfect for holiday parties or family gatherings.
Key Ingredients
For the Crust
- 72 Oreo cookies, finely crushed
- 1 cup unsalted butter, melted
For the Cheesecake Filling
- 4 (8 oz) packages cream cheese, softened
- 4 cups powdered sugar
- 32 oz Cool Whip or homemade whipped cream
- Neon green food coloring (adjust as needed)
- ½ teaspoon mint extract (optional)
- Red heart sprinkles or red candies (for garnish)
Tools Needed
- Food processor or rolling pin (for crushing cookies)
- Electric mixer
- Mixing bowls
- Rubber spatula
- 9×13-inch pan
- Offset spatula (for smoothing the top)
- Refrigerator
Cooking Instructions
Step 1: Prepare the Crust
Crush the Oreo cookies into fine crumbs using a food processor or place in a zip-top bag and crush with a rolling pin. Stir in the melted butter until well combined. Press the mixture evenly into a 9×13-inch pan, pressing firmly to create a solid crust. Chill in the refrigerator while preparing the filling.
Step 2: Mix the Cheesecake Base
In a large mixing bowl, beat the softened cream cheese until completely smooth—no lumps. Add in the powdered sugar and beat until light and fluffy, about 2–3 minutes.
Step 3: Color and Fold
Gently fold in the Cool Whip, neon green food coloring, and mint extract (if using). Adjust the green coloring gradually until you reach that perfect Grinch shade—bright, bold, and unapologetic.
Step 4: Assemble and Chill
Spread the filling evenly over the chilled crust. Use an offset spatula to smooth the surface. Refrigerate for at least 4 hours, or until fully set.
Step 5: Decorate and Serve
Just before serving, add red heart sprinkles or candies on top for the Grinch’s “growing heart.” Slice into squares and serve cold.
Why You’ll Love This Recipe
No oven needed perfect for busy holiday kitchens
Eye-catching and fun for kids and adults
Cool, minty creaminess balanced with crunchy Oreo crust
Simple steps ideal for beginner bakers
Easily customizable with different extracts or toppings
Mistakes to Avoid & Solutions
Using warm cream cheese
This can lead to a lumpy filling that won’t blend smoothly.
Solution: Let the cream cheese sit at room temperature for about 30 minutes before mixing to ensure a silky base.
Over-mixing the Cool Whip
It can deflate the filling and make it dense instead of light and fluffy.
Solution: Gently fold the Cool Whip into the mixture just until combined. Avoid vigorous stirring.
Skipping the chill time
The cheesecake won’t hold its shape and may be messy to slice.
Solution: Chill for at least 4 hours, or overnight, to let the filling fully set and firm up.
Adding too much food coloring at once
The color can become overly intense or uneven.
Solution: Add the neon green food coloring gradually and stir in between drops until you reach your desired shade.
Loose crust
It may crumble or fall apart when slicing and serving.
Solution: Press the Oreo mixture down firmly using a flat-bottomed cup or spatula to create a compact, stable base.
Serving and Pairing Suggestions
Serve chilled on a decorative holiday platter
Pair with hot cocoa, peppermint tea, or spiced mulled cider
Add to a dessert buffet for a pop of color
Slice into squares or cut with cookie cutters for fun shapes
Garnish each square with whipped cream for extra flair
Storage and Reheating Tips
Refrigerator: Store covered in the fridge for up to 5 days.
Freezer: Freeze individual slices wrapped tightly in plastic, then foil. Best eaten within 1 month.
Thawing: Let thaw in the fridge overnight avoid microwaving.
Do not reheat this cheesecake is meant to be served cold.
FAQs
1. Can I use regular whipped cream instead of Cool Whip?
Yes! Use about 8 cups of homemade whipped cream (whipped to soft peaks) as a substitute.
2. Can I make this without mint flavor?
Absolutely. Just leave out the mint extract—it’s optional and doesn’t affect the structure.
3. What’s the best way to cut clean slices?
Chill thoroughly and use a warm knife, wiping between cuts for sharp edges.
4. Can I use a springform pan instead of a 9×13-inch pan?
Yes, just be sure to press the crust firmly along the bottom and sides. It may need a slightly longer chill to hold shape.
5. Is there a gluten-free version?
You can use gluten-free sandwich cookies for the crust to make the recipe gluten-free.
Tips & Tricks
For extra crunch, add crushed peppermint candies to the crust.
Use clear vanilla extract to keep the filling’s color vibrant.
Chill the mixing bowl beforehand to help keep the filling firm.
If the mixture feels too loose, fold in more Cool Whip one cup at a time.
Top with crushed candy canes for a peppermint crunch.
Recipe Variations
Chocolate Swirl Version
Add ½ cup melted dark chocolate to half of the filling. Swirl it gently into the green layer before chilling.
Gingerbread Crust Twist
Swap the Oreo crust for crushed ginger snaps for a warm, spiced base. Use 72 ginger snaps and 1 cup melted butter.
Coconut-Mint Version
Add ½ cup shredded coconut to the filling and top with toasted coconut flakes. The tropical vibe pairs nicely with mint.
Mini Cheesecake Cups
Instead of a large pan, divide the crust and filling into cupcake liners for single-serve treats ideal for parties or lunchboxes.
Final Thoughts
There’s always a little room at the table for something playful especially when it comes with mint, chocolate, and a splash of neon green. This No-Bake Grinch Christmas Cheesecake manages to stand out in the middle of a crowded dessert spread. It’s quirky, cool, and yes, completely oven-free, which means more room in the kitchen for casseroles, pies, and roasted everything.
It’s the kind of treat that doesn’t take itself too seriously but still delivers big flavor. Whether you’re sharing it at a church potluck, surprising your coworkers, or just need something festive for the kids’ holiday movie night, this cheesecake will absolutely steal the spotlight Grinch-style.
Creamy No-Bake Grinch Christmas Cheesecake
Course: DessertDifficulty: Easy18
servings25
minutes4
hoursThis No-Bake Grinch Christmas Cheesecake is a minty, creamy, neon-green dessert with a chocolate Oreo crust and red candy heart topping. Easy to make, festive to look at, and perfect for holiday parties or family gatherings.
Ingredients
- For the Crust
72 Oreo cookies, finely crushed
1 cup unsalted butter, melted
- For the Cheesecake Filling
4 (8 oz) packages cream cheese, softened
4 cups powdered sugar
32 oz Cool Whip or homemade whipped cream
Neon green food coloring (adjust as needed)
½ teaspoon mint extract (optional)
Red heart sprinkles or red candies (for garnish)
Directions
- Crush Oreos into fine crumbs and mix with melted butter. Press firmly into a 9×13-inch pan and chill.
- Beat cream cheese until smooth, then add powdered sugar and mix until fluffy.
- Fold in Cool Whip, green food coloring, and mint extract. Adjust the color to your liking.
- Spread filling over the crust, smooth the top, and refrigerate for at least 4 hours.
- Top with red heart candies before serving. Slice into squares and serve cold.