Chewy Ghostbusters Stay Puft Marshmallows
Ghostbusters Stay Puft Marshmallows came to life during a Halloween prep night that had very little to do with cooking and everything to do with chaos. It started in my cousin Kevin’s garage, which had somehow become headquarters for crafting costumes, testing smoke machines, and troubleshooting a haunted house app that kept crashing. Between spilled paint and way too much glitter, my aunt June showed up holding a bag of marshmallows and said, “Can we make something edible, please?”
My niece Maya, dressed in half a Ghostbusters jumpsuit, immediately shouted, “Let’s make Stay Puft!” while Kevin tried to remember how the marshmallow man looked without Googling it (we didn’t let him). We ended up gathering on the kitchen counter, surrounded by candy eyes and sticky fingers, dipping and stacking marshmallows like tiny architects on a sugar rush.
The whole thing was messy, hilarious, and somehow incredibly therapeutic after a long week. It wasn’t about precision; it was about bringing a favorite movie moment into the real world with chocolate and sugar and a marker that, surprisingly, didn’t stain our hands.
That night, those Ghostbusters Stay Puft Marshmallows became more than a snack they became part of our tradition. Now, even when the party looks different, someone always asks if the marshmallow guy’s coming back.
Short Description
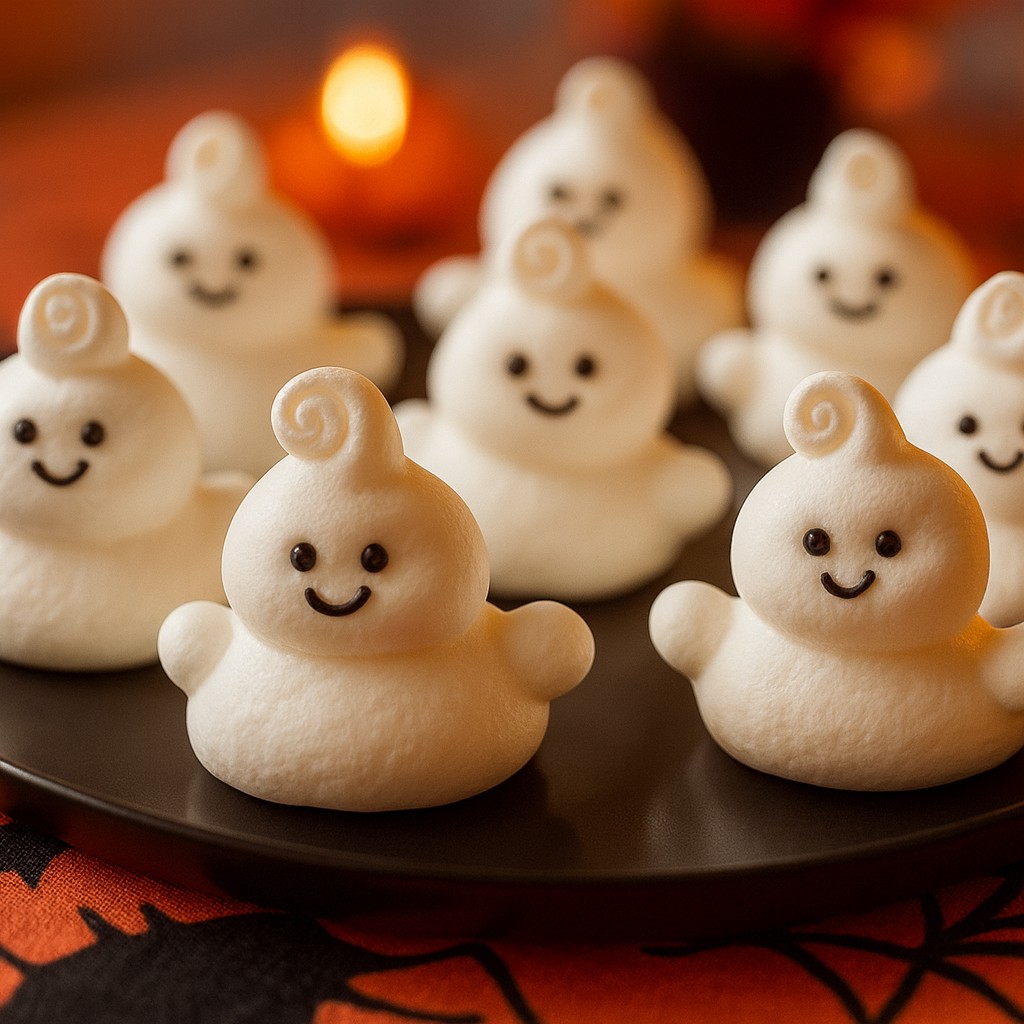
Ghostbusters Stay Puft Marshmallows are stacked, dipped in white chocolate, and finished with candy eyes and a marker smile.
Key Ingredients
- 9 large marshmallows (3 per figure)
- ½ cup white chocolate chips
- 1 teaspoon vegetable shortening
- 2 tablespoons powdered sugar (for dusting)
- 6 candy eyes
- 1 black edible marker
Tools Needed
- Microwave-safe bowl
- Parchment-lined baking sheet
- Toothpicks or skewers (optional for stacking support)
- Small spoon or offset spatula
- Butter knife (for spreading if needed)
Cooking Instructions
Step 1: Melt the Coating
In a microwave-safe bowl, combine white chocolate chips and vegetable shortening. Microwave in 30-second intervals, stirring in between, until smooth and fully melted. It should be glossy and fluid, not thick.
Step 2: Assemble the Body
Dip the bottom of one marshmallow into the melted chocolate and press it onto the parchment-lined tray. Stack two more marshmallows on top, using a bit of chocolate between each to glue them together. Let them stand for 2 minutes to firm slightly.
Step 3: Coat with Chocolate
Use a spoon or spatula to coat the entire marshmallow figure with the remaining white chocolate. Don’t worry about perfection just cover evenly before the chocolate begins to harden.
Step 4: Decorate While Wet
Immediately press two candy eyes into the top marshmallow while the coating is still wet. They should stick easily.
Step 5: Dust and Dry
Lightly dust with powdered sugar for that soft, ghostly finish. Let the figures sit for 15 minutes or until the chocolate coating is fully set and dry to the touch.
Step 6: Add the Face
Once the coating is dry, use the edible marker to draw a wide Stay Puft smile on each face. You can add eyebrows or eyebrows if you’re feeling creative!
Why You’ll Love This Recipe
No baking required
Great for movie nights and themed parties
Kid-friendly and fun to decorate
Customizable with different expressions
Ready in under 30 minutes
Sweet, soft, and a little spooky
Mistakes to Avoid & Solutions
Using chocolate without thinning it
White chocolate can be stiff when melted on its own.
Solution: Always add vegetable shortening to help it become smooth and easy to coat.
Stacking before the base sets
The bottom marshmallow can slide if the chocolate is too wet.
Solution: Let the base dry for 1–2 minutes before stacking more marshmallows on top.
Attaching eyes too late
Candy eyes will fall off if the chocolate has hardened.
Solution: Have eyes ready and place them immediately after coating.
Overusing the marker before chocolate dries
Ink will smudge if the surface isn’t dry.
Solution: Wait until the coating is completely firm before drawing on faces.
Skipping parchment paper
Marshmallows may stick to the tray.
Solution: Always work on parchment-lined trays for easy removal.
Serving and Pairing Suggestions
Serve on a Halloween dessert platter
Pair with hot cocoa or spiced cider
Add to movie night snack trays
Use as party favors in clear treat bags
Set up a decorate-your-own station for kids’ parties
Storage and Reheating Tips
Store in an airtight container at room temperature for up to 3 days
Avoid refrigeration it makes marshmallows rubbery
If storing longer, separate layers with wax paper
Do not microwave to reheat these are best enjoyed at room temperature
FAQs
1. Can I use homemade marshmallows instead of store-bought?
Yes, but ensure they’re firm and dry enough to stack. Store-bought ones are more stable for this project.
2. What if I don’t have candy eyes?
You can pipe small dots of dark chocolate or use mini chocolate chips instead.
3. Can kids help make this?
Absolutely. It’s a perfect hands-on activity for kids with minimal adult supervision (just handle the chocolate for them).
4. How long does it take for the chocolate to set?
About 15–20 minutes at room temperature, depending on humidity.
5. Can I add colors or hats to the Stay Puft faces?
Yes! Use colored candy melts or mini fondant hats for extra character details.
Tips & Tricks
Use a skewer through the marshmallows for stability while decorating
Keep chocolate warm in a water bath if decorating a big batch
Draw faces after placing on serving tray to avoid smudging
Let kids personalize with sprinkles or colored sugar
Use kitchen tweezers to place eyes more precisely
Recipe Variations
1. Chocolate Dipped Ghostbusters Stay Puft Marshmallows
Replace white chocolate with melted dark chocolate for a twist. Stack the same way, but add mini marshmallows as hands or buttons for extra detail.
2. Peppermint Stay Puft Marshmallows
Add ¼ teaspoon peppermint extract to the white chocolate coating and sprinkle crushed candy canes on top before it sets.
3. Gluten-Free Version
Double-check that all your ingredients (including candy eyes and chocolate) are certified gluten-free.
4. Vegan-Friendly Version
Use vegan marshmallows, dairy-free white chocolate chips, and coconut oil instead of shortening.
5. Mini Marshmallow Pops
Use mini marshmallows and stack just two. Insert a lollipop stick in the bottom and decorate for bite-sized cuteness.
Final Thoughts
Making Ghostbusters Stay Puft Marshmallows reminded me that the best recipes are sometimes the least serious. There’s something about dipping marshmallows into warm chocolate with candy eyes staring back at you that breaks down every grown-up rule in the kitchen and that’s a good thing.
It’s not about sharp lines or even coating; it’s about play. About laughing through sticky fingers and letting your food be silly. It doesn’t have to look perfect to be the thing people remember.
Next time someone mentions Stay Puft, don’t just quote the movie. Invite them into your kitchen, hand them a marker, and start stacking marshmallows. Because edible nostalgia? That’s the kind of magic we could all use more of.
Chewy Ghostbusters Stay Puft Marshmallows
Course: DessertDifficulty: Easy3
servings10
minutes15
minutesGhostbusters Stay Puft Marshmallows are stacked, dipped in white chocolate, and finished with candy eyes and a marker smile.
Ingredients
9 large marshmallows (3 per figure)
½ cup white chocolate chips
1 teaspoon vegetable shortening
2 tablespoons powdered sugar (for dusting)
6 candy eyes
1 black edible marker
Directions
- Melt white chocolate and vegetable shortening in the microwave, stirring until smooth and glossy.
- Dip one marshmallow in the chocolate, press onto parchment, and stack two more on top using chocolate as glue.
- Coat the entire figure with melted chocolate until evenly covered.
- Attach candy eyes while the coating is still wet.
- Dust lightly with powdered sugar and let set for about 15 minutes.
- Draw a Stay Puft smile with an edible marker once fully dry.