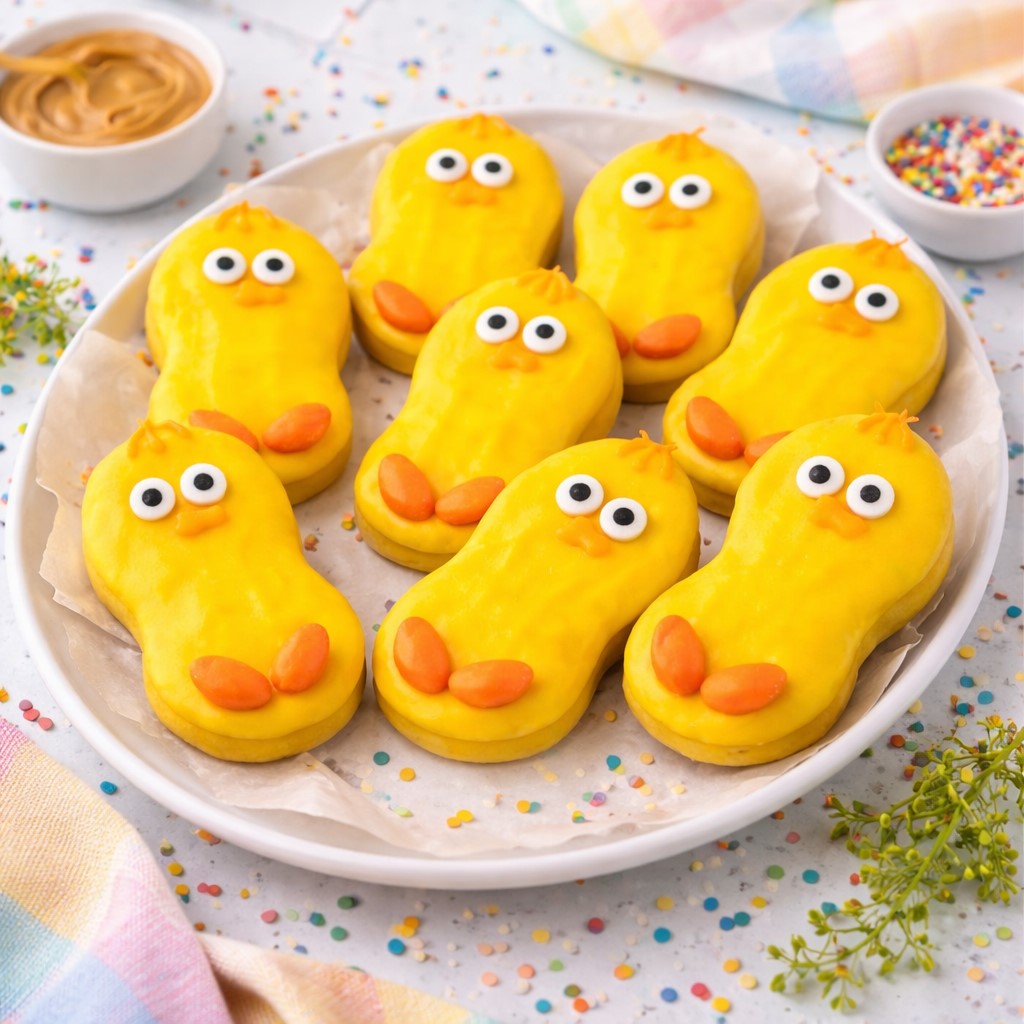
Cheerful Nutter Butter Chicks
At my friend Reina’s annual Easter craft party, the dining table turns into a pastel explosion paper bunny ears, bowls of jelly beans, and enough glitter to haunt your vacuum for months.
Last spring, she added a “sweet treat decorating station” for the kids and asked me to bring something easy but eye-catching. I arrived with a tray of Nutter Butter Chicks, and within minutes, frosting-covered fingers and wide-eyed toddlers were gathering to build their own. Even the dads joined in, arguing over which chick had the better “feather swirl.”
Two weeks later, I made them again at my sister-in-law’s baby shower, where the yellow color theme matched the nursery. She smiled through happy tears as her friends snapped photos of the tiny chick cookies next to duck-shaped macarons and pineapple punch.
The Nutter Butter Chicks were the simplest thing on the dessert table, but they were the first to go. There’s just something about the combo of peanut butter, chocolate, and whimsy that never fails to light up a party.
This week, I taught a small hands-on class at the local library’s spring break camp. The kids decorated their chicks with different expressions some cheerful, some very angry and proudly lined them up like a parade on parchment paper.
It was joyful, slightly chaotic, and completely worth it. These Nutter Butter Chicks are more than just cute. They’re a craft, a snack, and a memory all in one.
Short Description
These Nutter Butter Chicks are playful, peanut-buttery treats dipped in yellow chocolate and decorated with candy eyes and orange beaks perfect for Easter, baby showers, or spring-themed parties.
Key Ingredients
- 16 Nutter Butter cookies
- 12 ounces yellow melting wafers
- 3 tablespoons orange icing
- 16 orange M&Ms, cut in half
- 32 small candy eyes
Tools Needed
- Microwave-safe bowl or double boiler
- Parchment paper
- Small spoon or dipping tool
- Piping bag or zip-top bag for icing
- Sharp knife
- Baking sheet or tray
- Toothpicks (optional for cleanup)
Cooking Instructions
Step 1: Melt the yellow coating
Place yellow melting wafers in a microwave-safe bowl. Heat in 30-second intervals, stirring between each, until smooth and glossy. Alternatively, melt using a double boiler.
Step 2: Dip the cookies
Using tongs or a spoon, dip each Nutter Butter cookie into the melted chocolate, coating completely. Let the excess drip off before placing it on parchment-lined baking sheet.
Step 3: Let them set
Allow the coated cookies to set completely at room temperature until the chocolate firms up. If needed, pop them in the fridge for 10–15 minutes.
Step 4: Decorate the chicks
Use orange icing to attach two candy eyes and half of an orange M&M as the beak on each cookie.
Step 5: Add facial features
With the remaining icing, pipe a small dot above the beak as a feather tuft or draw simple “wings” along the sides.
Step 6: Chill before serving
Place decorated chicks in the fridge for at least 1 hour to fully set. Serve chilled or let sit at room temp for 10 minutes before plating.
Why You’ll Love This Recipe
No baking required
Great for decorating with kids or groups
Festive and fun presentation
Perfect balance of peanut butter and chocolate
Easy to customize for different themes
Mistakes to Avoid & Solutions
Chocolate too thick or clumpy
Can make dipping difficult and messy.
Solution: Add ½ teaspoon of neutral oil (like coconut or vegetable) to smooth out the melted wafers.
Cookies breaking during dipping
Happens if you press too hard or the chocolate is too thick.
Solution: Hold gently at the edges and use a spoon to assist with coating.
Eyes or beaks sliding off
Icing may be too runny or surface still too warm.
Solution: Let the coating fully set before adding decorations, and use a thick, piping-consistency icing.
Melting wafers seizing
Water or steam may have gotten in.
Solution: Always keep tools and bowls dry when melting chocolate.
Uneven coating
Occurs when chocolate cools too fast.
Solution: Reheat gently as needed and stir often to maintain smoothness.
Serving and Pairing Suggestions
Serve on a colorful spring dessert tray
Pair with lemonade, fruit punch, or herbal teas
Add to Easter baskets or kids’ party favor bags
Display on lollipop sticks for a cookie pop variation
Include alongside carrot cake or lemon bars for variety
Storage and Reheating Tips
Room Temp: Store in airtight container up to 4 days
Refrigerator: Best for warm climates; lasts up to 7 days
Freezer: Not recommended due to candy eyes and icing cracking
To serve: Bring to room temperature for 10–15 minutes before enjoying
FAQs
1. Can I use homemade peanut butter cookies instead of Nutter Butters?
Yes, but make sure they’re firm enough to hold their shape when dipped.
2. What can I use instead of yellow melting wafers?
White chocolate with yellow food coloring works in a pinch, but may require tempering.
3. Are there allergy-friendly alternatives?
Try using a nut-free sandwich cookie and allergy-safe candy melts for schools or events with restrictions.
4. Can I make these ahead of time?
Yes! Make them a day or two in advance and store in a cool place.
5. Do I need special icing tools?
Not at all—use a zip-top bag with a tiny snip in the corner to pipe features.
Tips & Tricks
Use tweezers or clean fingers to precisely place eyes and beaks
For brighter color, double-dip the cookies once the first layer sets
Add a drop of lemon extract to melted wafers for a citrus twist
Label chicks with names for seating cards at kids’ tables
Keep decorations simple for younger helpers—less is more
Recipe Variations
Pastel Rainbow Chicks
Use pastel melting wafers in pink, blue, or green. Match the icing and eyes accordingly for a colorful spring spread.
Choco-Chicks
Dip in milk or dark chocolate instead of yellow. Use orange gel icing and candy beaks for contrast.
Mini Chicks
Use mini Nutter Butters (or break full ones in half before coating) for bite-sized versions perfect for party trays.
Spicy Chickens
Add a tiny sprinkle of cayenne or cinnamon sugar to the yellow coating before it sets for a subtle kick.
Fruity Beak Option
Replace M&Ms with small dried apricots cut into triangles for a chewy texture and natural sweetness.
Final Thoughts
The Nutter Butter Chicks have quickly turned into one of those treats that pop up across the seasons not because they’re fancy or elaborate, but because they’re easy, adorable, and make people smile. From spring craft tables to baby showers and classroom projects, they bring energy and color wherever they go.
Each chick carries its own personality some with wonky eyes, others with proud puffs of icing feathers and that’s what makes them special. This isn’t just about assembling cookies. It’s about creating a moment to share, laugh, and nibble together. And that’s the kind of memory I’ll always say yes to.
Cheerful Nutter Butter Chicks
Course: DessertDifficulty: Easy16
servings25
minutes1
hoursThese Nutter Butter Chicks are playful, peanut-buttery treats dipped in yellow chocolate and decorated with candy eyes and orange beaks perfect for Easter, baby showers, or spring-themed parties.
Ingredients
16 Nutter Butter cookies
12 ounces yellow melting wafers
3 tablespoons orange icing
16 orange M&Ms, cut in half
32 small candy eyes
Directions
- Melt yellow wafers in a microwave-safe bowl in 30-second intervals until smooth, or use a double boiler.
- Dip each Nutter Butter into the melted coating, let excess drip off, and place on parchment-lined tray.
- Let cookies set at room temp or chill for 10–15 minutes until firm.
- Attach candy eyes and halved orange M&Ms using orange icing.
- Pipe feather tuft or wing lines with remaining icing.
- Chill chicks for at least 1 hour before serving.