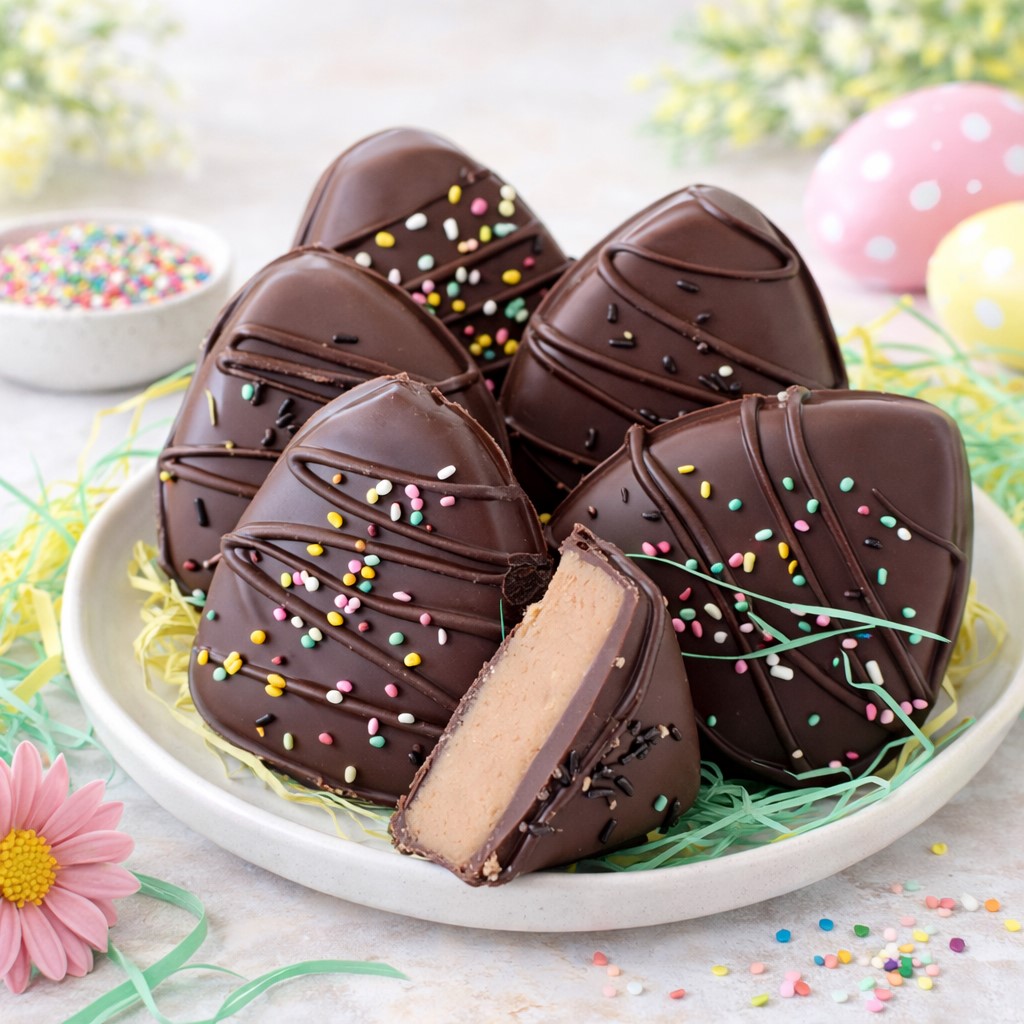
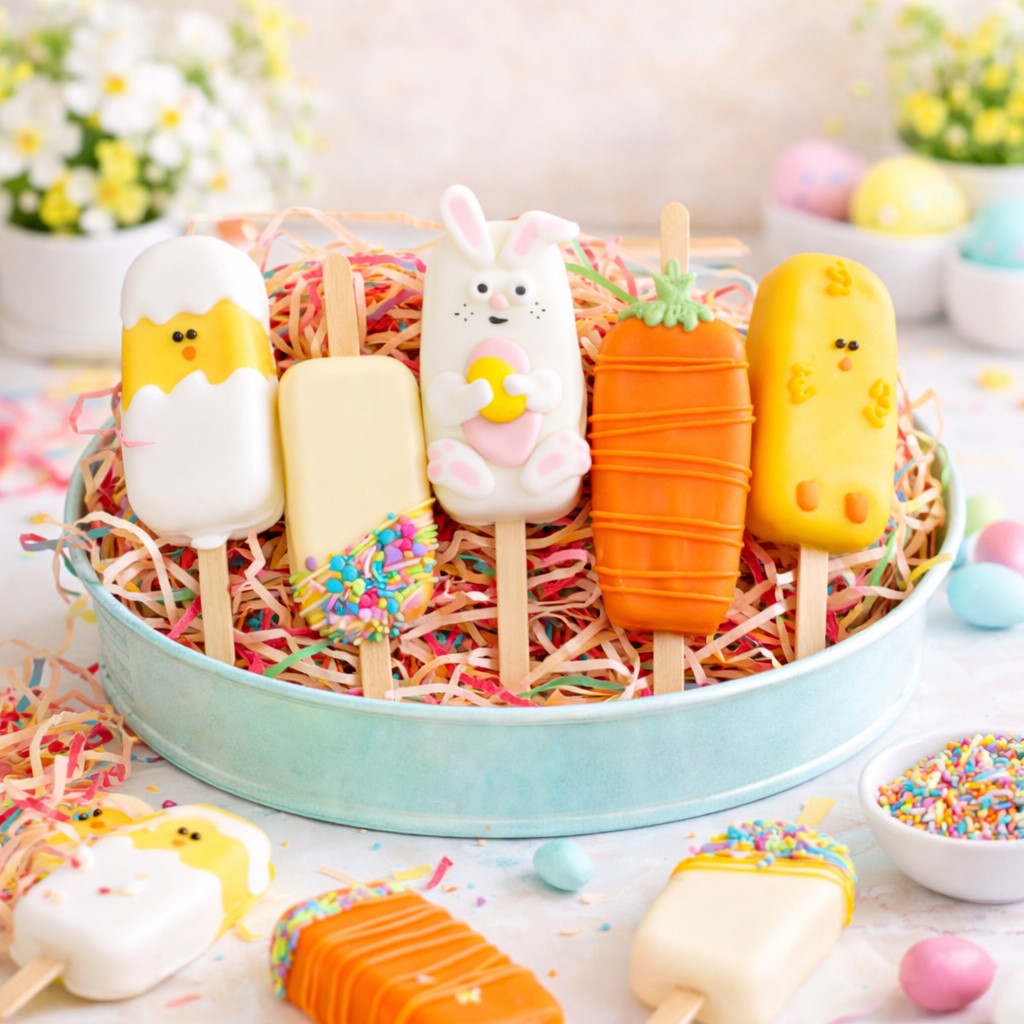
Delightful Easter Cakesicles
The kitchen filled early that morning with soft laughter and pastel colors scattered across the table, as everyone prepared for a small spring gathering. A tray of decorations sat nearby, with little candy flowers, sprinkles,
and chocolate melts in soft shades waiting to be used. Kids leaned over the counter, pointing at molds, while someone carefully melted chocolate in the background.
In that cheerful setting, Easter Cakesicles quickly became the centerpiece project, not just something to eat but something to create together. The process felt playful, shaping cake into smooth molds and watching each layer set into something neat and glossy. Hands moved between mixing bowls and decorating tools, each person adding their own small detail.
As the designs came together, the cakesicles started to look like tiny edible characters. Some turned into bunnies with soft pink accents, others into bright chicks with tiny eyes and beaks. Placing them on a tray felt like arranging a collection of little spring stories, each one slightly different but connected through the same simple base.
Short Description
A fun and creative dessert made from cake and frosting, coated in chocolate and decorated into festive Easter themed treats.
Key Ingredients
- Baked cake, cooled
- Frosting
- White, yellow, orange candy melts
- Royal icing or colored candy melts
- Sprinkles
- Cadbury mini eggs optional
Tools Needed
- Cakesicle molds
- Popsicle sticks
- Microwave safe bowls
- Spatula or spoon
- Piping bags
- Toothpick or scribe tool
Cooking Instructions
Step 1: Melt the Coating
Melt candy melts according to instructions until smooth and glossy.
Step 2: Coat the Molds
Spread melted chocolate inside molds evenly using a brush or spoon.
Step 3: Insert Sticks
Place popsicle sticks into the molds while chocolate is still soft.
Step 4: Prepare Filling
Mix crumbled cake with a few tablespoons of frosting until a soft dough forms.
Step 5: Fill the Molds
Once chocolate shell is set, press cake mixture inside leaving space at the top.
Step 6: Seal with Chocolate
Cover with more melted chocolate and smooth the surface, then chill until firm.
Step 7: Remove Cakesicles
Gently release from molds once fully set.
Step 8: Decorate Base Designs
Use melted chocolate or icing to pipe shapes, faces, or patterns.
Step 9: Add Details
Attach decorations like candy eyes, flowers, or mini eggs using melted chocolate.
Step 10: Final Touches
Allow decorations to set completely before serving.
Why You’ll Love This Recipe
Creative and customizable designs
Perfect for holiday activities
Soft, rich cake inside with crisp coating
Great for sharing with kids and family
No complicated baking required
Mistakes to Avoid & Solutions
Chocolate too thick
Makes coating uneven.
Solution: Warm gently until smooth and fluid.
Shell too thin
Breaks easily when removing.
Solution: Apply two layers of chocolate.
Overfilling molds
Prevents proper sealing.
Solution: Leave a small gap at the top.
Decorations sliding
Occurs when surface is not set.
Solution: Let coating firm before decorating.
Cake mixture too dry
Hard to shape.
Solution: Add more frosting gradually.
Serving and Pairing Suggestions
Serve on a decorated Easter tray
Pair with milk or hot chocolate
Add to dessert boxes or gift sets
Present as party favors
Arrange in baskets for themed displays
Storage and Reheating Tips
Store in airtight container at room temperature for 2 days
Refrigerate up to 5 days for longer storage
Keep away from heat to prevent melting
Bring to room temperature before serving
Do not microwave to preserve structure
FAQs
Can I use any cake flavor?
Yes, chocolate, vanilla, or even fruit based cakes work well.
Do I need a special mold?
Cakesicle molds help shape evenly, but silicone molds can also work.
Why is my chocolate cracking?
It may be too cold or too thin. Let it set gradually.
Can I freeze cakesicles?
Yes, freeze up to 1 month in airtight packaging.
What if I don’t have candy melts?
You can use tempered chocolate instead.
Tips & Tricks
Use gel coloring for vibrant decoration
Chill molds briefly for faster setting
Practice designs on parchment before piping
Keep decorations simple for cleaner results
Recipe Variations
Chocolate Version
Use chocolate cake base and dark chocolate coating for a richer taste.
Fruit Version
Add strawberry or lemon zest to the cake mixture for a fresh flavor.
Mini Cakesicles
Use smaller molds for bite sized treats, reducing chilling time slightly.
Crunchy Version
Mix crushed cookies into the cake filling for added texture.
Final Thoughts
The process of shaping and decorating these treats brings a quiet kind of joy that goes beyond baking itself. Each step adds a small layer of creativity, turning simple ingredients into something that feels personal and thoughtful. Watching the tray fill with colorful designs creates a moment that feels light and shared.
Gatherings built around food often carry small memories within them, and this recipe fits easily into that space. It allows room for creativity without pressure, letting each person contribute something of their own while keeping the experience relaxed and enjoyable.
Delightful Easter Cakesicles
Course: DessertDifficulty: Easy10
servings30
minutes1
hourA fun and creative dessert made from cake and frosting, coated in chocolate and decorated into festive Easter themed treats.
Ingredients
Baked cake, cooled
Frosting
White, yellow, orange candy melts
Royal icing or colored candy melts
Sprinkles
Cadbury mini eggs optional
Directions
- Melt candy melts until smooth and glossy.
- Spread melted chocolate evenly inside molds.
- Insert popsicle sticks while chocolate is still soft.
- Mix crumbled cake with frosting until a soft dough forms.
- Fill molds with cake mixture, leaving space at the top.
- Cover with more melted chocolate, smooth, then chill until firm.
- Gently remove cakesicles from molds once set.
- Pipe designs using melted chocolate or icing.
- Attach decorations like eyes, flowers, or mini eggs.
- Let decorations set completely before serving.