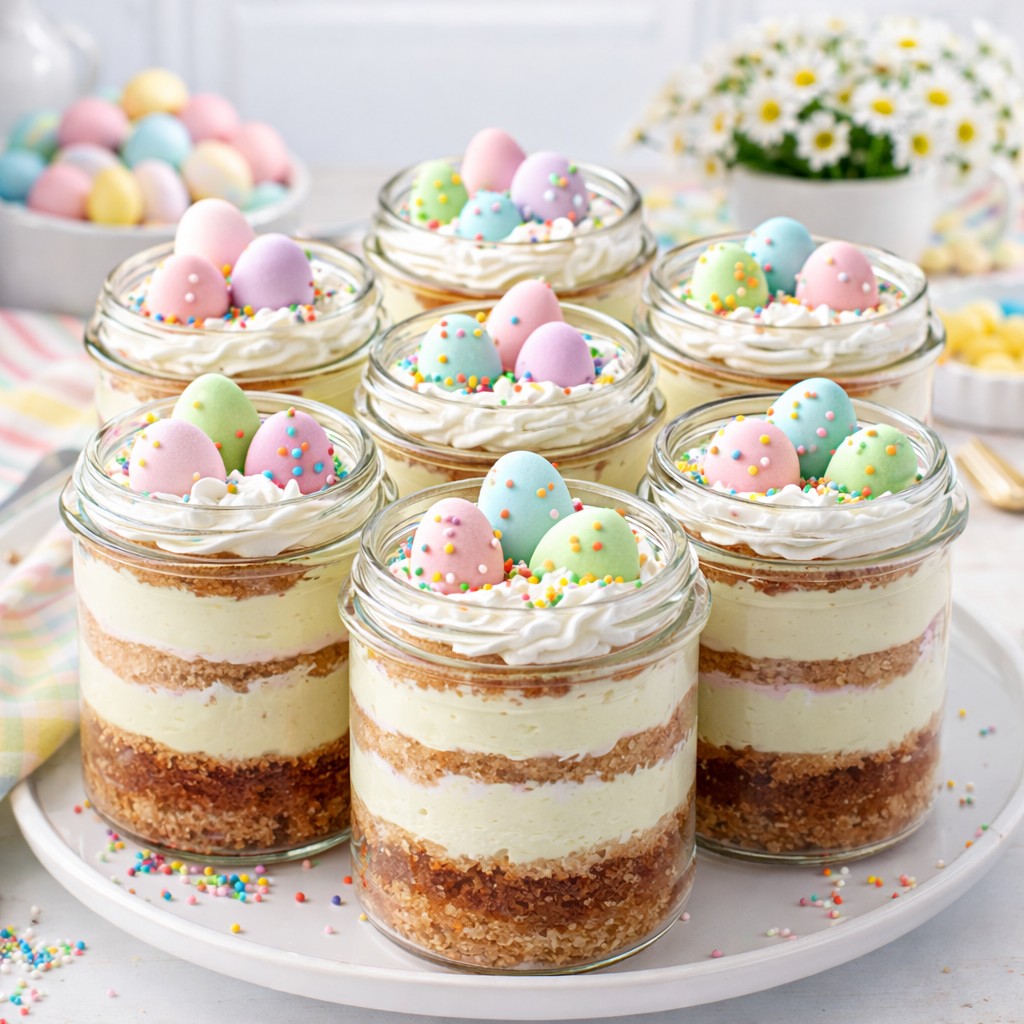
Easter Egg Cheesecake Jars
Easter Egg Cheesecake Jars came together after a morning of dye-stained fingertips and paper grass all over my living room floor. Our small-town preschool had assigned parents to bring “spring-themed” desserts for the annual egg hunt picnic,
and I overheard two moms whispering about how messy cupcakes had been last year. That was enough for me to start planning something spoonable, layered, and easy to transport.
That afternoon, my friend Camilla dropped by with her twins, and while the kids played with plastic eggs and chalk on the patio, we layered graham crumbs and whipped cheesecake into mini jars. I let the girls sprinkle on rainbow confetti while Camilla gently pressed candy eggs on top. Each one turned out different some neat, some messy, all beautiful in their own way.
We chilled them until the morning of the event, tucked them into a cooler, and handed them out right after the egg hunt. I watched a group of five-year-olds dig in with tiny spoons, balancing jars on their laps in the sunshine.
No crumbs, no chaos, just creamy cheesecake and chocolate eggs in every bite. These Easter Egg Cheesecake Jars became the one thing every parent asked about afterward.
Short Description
Creamy, no-bake Easter Egg Cheesecake Jars layered with buttery graham cracker crust and whipped cheesecake, topped with candy eggs and sprinkles.
Key Ingredients
For the Crust
- 1 cup graham cracker crumbs
- 2 tablespoons granulated sugar
- 4 tablespoons unsalted butter, melted
For the Cheesecake Layers
- 8 ounces cream cheese, softened
- ½ cup powdered sugar
- 1 teaspoon vanilla extract
- 1 cup heavy cream, whipped to stiff peaks
- Pink gel food coloring or 1 tablespoon freeze-dried strawberry powder (optional)
For the Topping
- Whipped cream
- 12 to 18 pastel candy eggs
- Rainbow or pastel sprinkles
Tools Needed
- Mixing bowls
- Electric mixer or hand whisk
- Rubber spatula
- Spoon or cookie scoop
- Mini jars or clear dessert cups
- Piping bag or zip-top bag (optional for layering)
Cooking Instructions
Step 1: Make the crust
In a bowl, mix graham cracker crumbs, sugar, and melted butter until evenly moistened. It should feel like damp sand.
Step 2: Press into jars
Spoon a layer of crust into the bottom of each jar and press down lightly with the back of a spoon to form a base.
Step 3: Make the cheesecake filling
Beat softened cream cheese until smooth. Add powdered sugar and vanilla and continue beating until fluffy. Gently fold in the whipped cream until light and airy.
Step 4: Divide and tint
Separate the cheesecake filling into two bowls. Leave one plain and add pink gel food coloring or strawberry powder to the other, folding gently.
Step 5: Layer the cheesecake
Spoon or pipe the pink cheesecake layer over the crust, then top with the white cheesecake layer.
Step 6: Decorate
Top each jar with a swirl of whipped cream, a few candy eggs, and sprinkles.
Step 7: Chill
Refrigerate the jars for at least 2 hours before serving to set the layers.
Why You’ll Love This Recipe
No baking required
Beautiful layered presentation in jars
Kid-friendly and portion-controlled
Customizable colors and toppings
Easy to prep ahead for holidays or events
Mistakes to Avoid & Solutions
Runny filling
Make sure to whip the cream to stiff peaks and fold it in gently. If it’s too soft, chill it longer before layering.
Crumbly crust
Use the full amount of melted butter and press it down firmly to hold together in the jar.
Overmixing whipped cream
Once the cream is folded into the cheesecake mixture, stop mixing as soon as it’s smooth.
Sinking decorations
Add whipped cream and toppings just before serving or after jars are chilled to keep them from sinking.
Uneven layers
Use a piping bag or small spoon for clean, even layering. Wipe down the inside of jars for neat edges.
Serving and Pairing Suggestions
Serve in clear mini jars for a festive look
Pair with iced herbal tea or lemonade
Include in Easter brunch buffets
Place in Easter baskets with a ribbon around the lid
Offer alongside fruit salad and tea cakes
Storage and Reheating Tips
Store in the fridge, covered, for up to 3 days
Do not freeze, as the texture may change
Add toppings just before serving for best results
Chill at least 2 hours before serving to set layers properly
Serve cold directly from the jar—no reheating needed
FAQs
1. Can I make these Easter Egg Cheesecake Jars the night before?
Yes, just wait to add whipped cream and candy eggs until just before serving for best texture.
2. Can I use store-bought whipped topping instead of whipping cream?
Absolutely, use 1 cup of thawed whipped topping folded into the cream cheese mixture.
3. What kind of jars work best?
4-ounce mason jars or plastic dessert cups work perfectly for individual portions.
4. Can I use other food coloring?
Yes, pastel shades work best. Use gel coloring to avoid changing the texture.
5. How do I transport these?
Keep them chilled in a cooler or insulated bag. Snap-on lids help prevent spills.
Tips & Tricks
Use freeze-dried fruit powder for natural color and flavor
Pipe layers with a zip-top bag for clean, even presentation
Press crusts firmly with a flat-bottomed glass or spoon
Decorate with edible flowers or chocolate shavings for a fancier look
Chill in the fridge on a tray so jars stay upright
Recipe Variations
Lemon Cheesecake Jars: Add lemon zest and a squeeze of lemon juice to the filling, and top with lemon jelly candies.
Chocolate Egg Jars: Mix cocoa powder into half the cheesecake layer and use chocolate graham crumbs for the base.
Berry Swirl Jars: Fold in a spoonful of berry jam to one half of the filling and swirl it before layering.
Carrot Cake Crust: Use crushed spiced cookies or carrot cake crumbs in place of graham crackers.
Mini Bunny Cheesecakes: Use bunny marshmallows or bunny-shaped candies as the topper instead of eggs.
Final Thoughts
Bringing these Easter Egg Cheesecake Jars to the picnic turned out to be one of those little wins I didn’t realize I needed. Each jar layered with care, dressed up in sprinkles, and filled with creamy cheesecake felt like a tiny celebration of spring. Watching kids decorate their own and grandparents take photos of them before digging in made the effort worth every step.
I’ve made them since for birthdays, baby showers, and quiet weekends when no one wanted a whole cake but still wanted something sweet. They always turn out charming, no matter who assembles them. There’s joy in creating something so light, playful, and delicious especially when it’s tucked into a jar and topped with a candy egg or two.
Easter Egg Cheesecake Jars
Course: DessertDifficulty: Easy6
servings25
minutes10
minutes2
hoursCreamy, no-bake Easter Egg Cheesecake Jars layered with buttery graham cracker crust and whipped cheesecake, topped with candy eggs and sprinkles.
Ingredients
- For the Crust
1 cup graham cracker crumbs
2 tablespoons granulated sugar
4 tablespoons unsalted butter, melted
- For the Cheesecake Layers
8 ounces cream cheese, softened
½ cup powdered sugar
1 teaspoon vanilla extract
1 cup heavy cream, whipped to stiff peaks
Pink gel food coloring or 1 tablespoon freeze-dried strawberry powder (optional)
- For the Topping
Whipped cream
12 to 18 pastel candy eggs
Rainbow or pastel sprinkles
Directions
- Mix graham crumbs, sugar, and melted butter until sandy.
- Spoon into jars and press lightly to form the crust base.
- Beat cream cheese, then add powdered sugar and vanilla. Fold in whipped cream until smooth.
- Divide filling, tint half pink with gel or strawberry powder.
- Layer pink cheesecake over crust, then add white layer.
- Top with whipped cream, candy eggs, and sprinkles.
- Chill jars for at least 2 hours before serving.