Festive Cherry Hand Pies
Cherry Hand Pies made a surprise debut at our annual neighborhood cookie swap, where Jen who’s usually more of a “store-bought platter” type brought them in a recycled cake box lined with tissue. “Don’t laugh,” she said, “they’re shaped like trees.” Not only did they steal the show, but people were slipping extras into their coat pockets. A week later, my cousin’s teen daughter made the same cherry-stuffed version for her school’s winter fair, piping tiny initials onto each crust in icing gel. They sold out before lunch.
This recipe has found its way into gift baskets, brunch tables, and even a December wedding dessert bar (where someone tried balancing one on a champagne flute). Cherry Hand Pies carry that perfect mix of rustic and refined portable yet polished.
From snowy mornings in Minnesota to a breezy holiday picnic in California, I’ve seen these treats travel far and still taste like home. Their buttery, golden shell hides a pop of glossy red that bursts with every bite, and the tree shapes make them irresistible on a holiday spread.
Once you try making these Cherry Hand Pies, you’ll see why they keep reappearing in our winter traditions. You don’t need fancy pastry skills, just a little patience and joy because these pies are as fun to make as they are to share.
Short Description
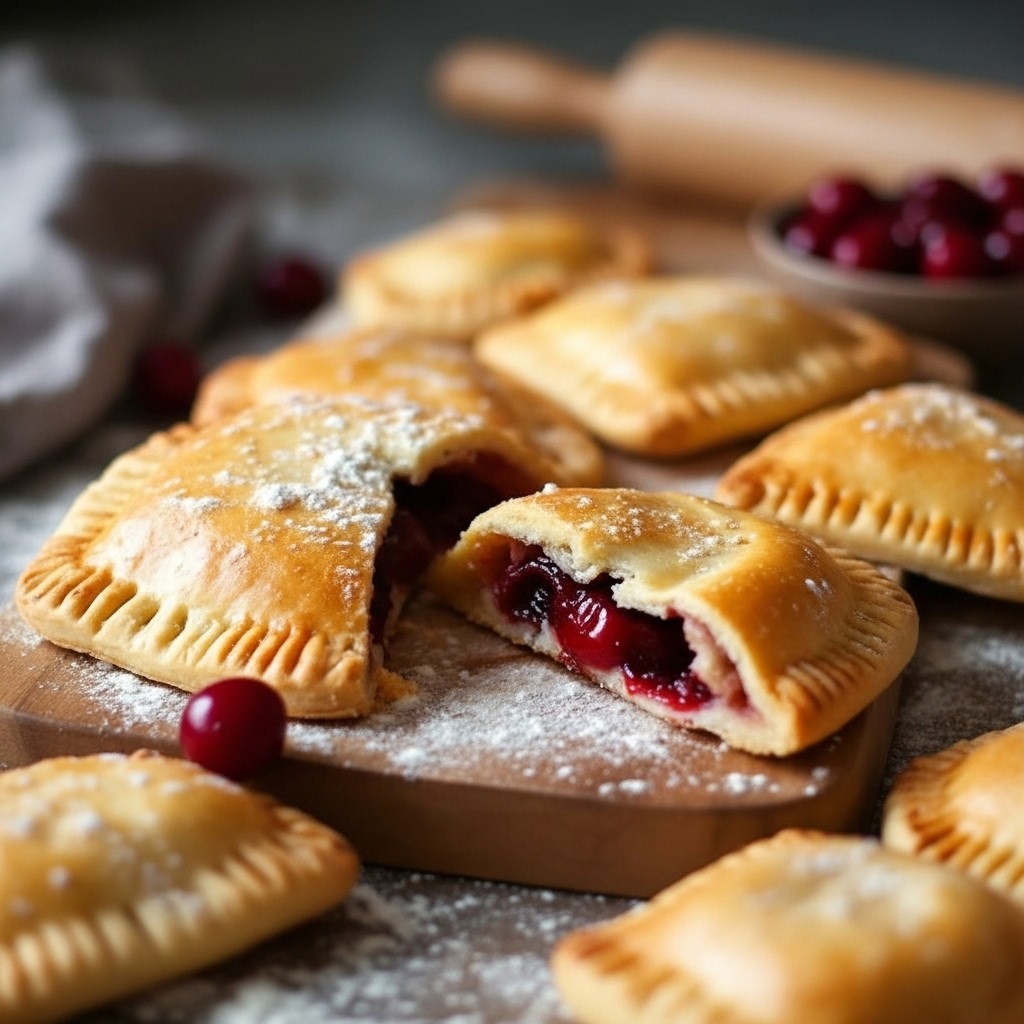
Golden, flaky Cherry Hand Pies filled with sweet-tart fruit and shaped into charming holiday trees. A simple, crowd-pleasing dessert that’s as fun to eat as it is to make.
Key Ingredients
- 3 boxes refrigerated pie crusts (2 crusts per box)
- 1 can (21 oz) cherry pie filling
- 2 large eggs
- 2 tablespoons water
- Coarse sanding sugar (optional)
Tools Needed
- Baking sheet
- Parchment paper
- Rolling pin
- Tree-shaped cookie cutter
- Fork
- Pastry brush
- Cooling rack
Cooking Instructions
Step 1: Prep the Dough
Preheat the oven to 350°F (175°C). Remove pie crusts from the fridge and let them soften slightly at room temperature. Line your baking sheet with parchment paper. In a small bowl, whisk together the eggs and water to make your egg wash.
Step 2: Shape the Trees
Roll each pie crust to about ¼ to ⅛ inch thick. Using a tree-shaped cookie cutter, cut as many trees as you can. Gather and reroll the scraps to make more. You’ll want an even number of trees for pairing.
Step 3: Fill and Seal
Place half the tree cutouts onto the prepared baking sheet. Spoon 1 to 1½ tablespoons of cherry filling into the center of each. Be careful not to overfill. Brush the edges with egg wash to help them seal.
Step 4: Add the Tops
Cover each base with another tree cutout. Press around the trunk first, then seal the edges gently with your fingers. Use a fork to crimp all sides for a neat finish. Cut two small slits in the top of each pie to let steam escape.
Step 5: Bake
Brush the tops with more egg wash and sprinkle with coarse sugar if using. Bake for 20 to 25 minutes, or until the pies are golden brown and crisp. Let cool on a wire rack before serving.
Why You’ll Love This Recipe
Festive and fun for all ages
Uses simple, store-bought ingredients
Easy to transport and serve
Great for parties, school events, and gifting
Flaky crust with a burst of bright cherry filling
Mistakes to Avoid & Solutions
Overfilling the pies
Too much filling can cause leaks during baking.
Solution: Use just 1 to 1½ tablespoons and keep it centered.
Crust not sealing properly
If edges lift or filling seeps out, it’s usually from a dry seal.
Solution: Use a generous egg wash and press firmly, then crimp with a fork.
Soggy bottoms
Pies may bake unevenly if the sheet is overcrowded.
Solution: Space the pies out well, and use parchment paper to absorb extra moisture.
Crust cracking during rolling
Refrigerated dough can break if rolled cold.
Solution: Let the dough sit for 10–15 minutes at room temp before rolling.
Filling spilling while eating
This happens if steam can’t escape.
Solution: Always cut slits in the top crust to vent.
Serving and Pairing Suggestions
Serve warm with vanilla bean ice cream
Add to a dessert buffet with holiday cookies
Pack into tins for edible gifts
Pair with hot chocolate, mulled wine, or apple cider
Stack in baskets for brunch or potlucks
Storage and Reheating Tips
Store in an airtight container at room temperature for up to 2 days
Refrigerate for up to 5 days
Reheat in a 300°F oven for 8–10 minutes until warm and crisp
Avoid microwaving to maintain texture
Freeze baked hand pies up to 1 month; thaw and reheat as above
FAQs
1. Can I use homemade pie crust instead of refrigerated?
Yes! Just roll it to the same thickness and cut as directed.
2. What if I don’t have a tree cookie cutter?
Use any festive shape, or simply cut squares or hearts by hand.
3. Can I substitute other pie fillings?
Absolutely. Apple, blueberry, or peach fillings work just as well.
4. How do I keep the filling from leaking out?
Make sure you seal the edges well and don’t overfill.
5. Can I make these ahead of time?
Yes! You can assemble the pies, freeze them unbaked, and bake straight from frozen. Just add 3–5 minutes to baking time.
Tips & Tricks
Chill assembled pies for 10 minutes before baking to help hold their shape
Use a small spoon or cookie scoop to portion the filling evenly
Sprinkle sanding sugar for extra sparkle
Rotate the baking sheet halfway through for even browning
Use a fine mesh sieve to drain excess syrup from cherry filling if it’s too runny
Recipe Variations
Chocolate Cherry Hand Pies
Add 1 teaspoon mini chocolate chips on top of each cherry filling before sealing for a rich twist.
Lemon Glazed Hand Pies
Skip the sanding sugar. After baking, drizzle with a glaze of powdered sugar and lemon juice.
Mini Pie Pops
Insert lollipop sticks before sealing the pies and bake as directed. Perfect for kids’ parties.
Savory Hand Pies
Use the same crust and fill with sautéed spinach, cheese, and mushrooms. Brush with egg wash and bake as above.
Final Thoughts
There’s a kind of joy that only small, golden pastries can bring especially when they’re shaped like tiny trees and filled with cherries. Cherry Hand Pies have slipped into so many kitchens this winter, from school bake tables to living room brunches, and each time they bring their own sparkle to the gathering. Maybe it’s the way the crust cracks just right or how the bright filling peeks out after a bite. Whatever it is, they always earn their spot on the plate.
Making them doesn’t require a celebration just a quiet hour, a warm oven, and a reason to bake something sweet. I’ve seen them passed between mittened hands, tucked into lunchboxes, and even balanced on holiday centerpieces like edible ornaments. That’s the magic of these Cherry Hand Pies they never stay on the tray for long.
Festive Cherry Hand Pies
Course: DessertDifficulty: Easy22
servings25
minutes25
minutesGolden, flaky Cherry Hand Pies filled with sweet-tart fruit and shaped into charming holiday trees. A simple, crowd-pleasing dessert that’s as fun to eat as it is to make.
Ingredients
3 boxes refrigerated pie crust 2 crusts per box
1 can 21 oz cherry pie filling
2 large eggs
2 tablespoons water
Coarse sanding sugar optional
Directions
- Preheat oven to 350°F (175°C). Thaw pie crusts. Line baking sheet with parchment. Whisk eggs with water for egg wash.
- Roll each crust to ¼–⅛ inch thick. Cut out tree shapes with cookie cutter. Save and re-roll scraps to make more.
- Place half the trees on baking sheet. Add 1 to 1½ tbsp cherry filling in the center. Brush edges with egg wash.
- Cover with another tree cutout. Press edges starting from trunk, then crimp with fork. Cut small slits on top.
- Brush tops with egg wash, sprinkle sugar if desired. Bake 20–25 mins until golden. Cool on rack, serve warm or room temp.