Rich Reese’s Peanut Butter Cup Pie
There are desserts that whisper comfort, and then there are desserts that sing it out loud. Reese’s Peanut Butter Cup Pie is one of those recipes that takes me right back to childhood. Years later, when I became a pastry chef, I reached for those same flavors not out of mischief this time, but out of love for how chocolate and peanut butter just belong together.
The first time I made this pie was for a neighborhood potluck. I didn’t expect much; it seemed almost too simple compared to the elaborate cakes and pastries I’d spent years crafting in kitchens. But the moment I set it on the table, eyes lit up. Every slice disappeared faster than I could blink, and neighbors were already asking for the recipe before the pan was even scraped clean.
Now, Rich Reese’s Peanut Butter Cup Pie has become a staple in my own family. My kids hover around the kitchen as I whip the filling, waiting for a chance to lick the spatula. The ganache pour has become their favorite part, like watching chocolate lava spread across a mountain of peanut butter clouds. It’s rich yet surprisingly light, indulgent yet approachable.
Short Description
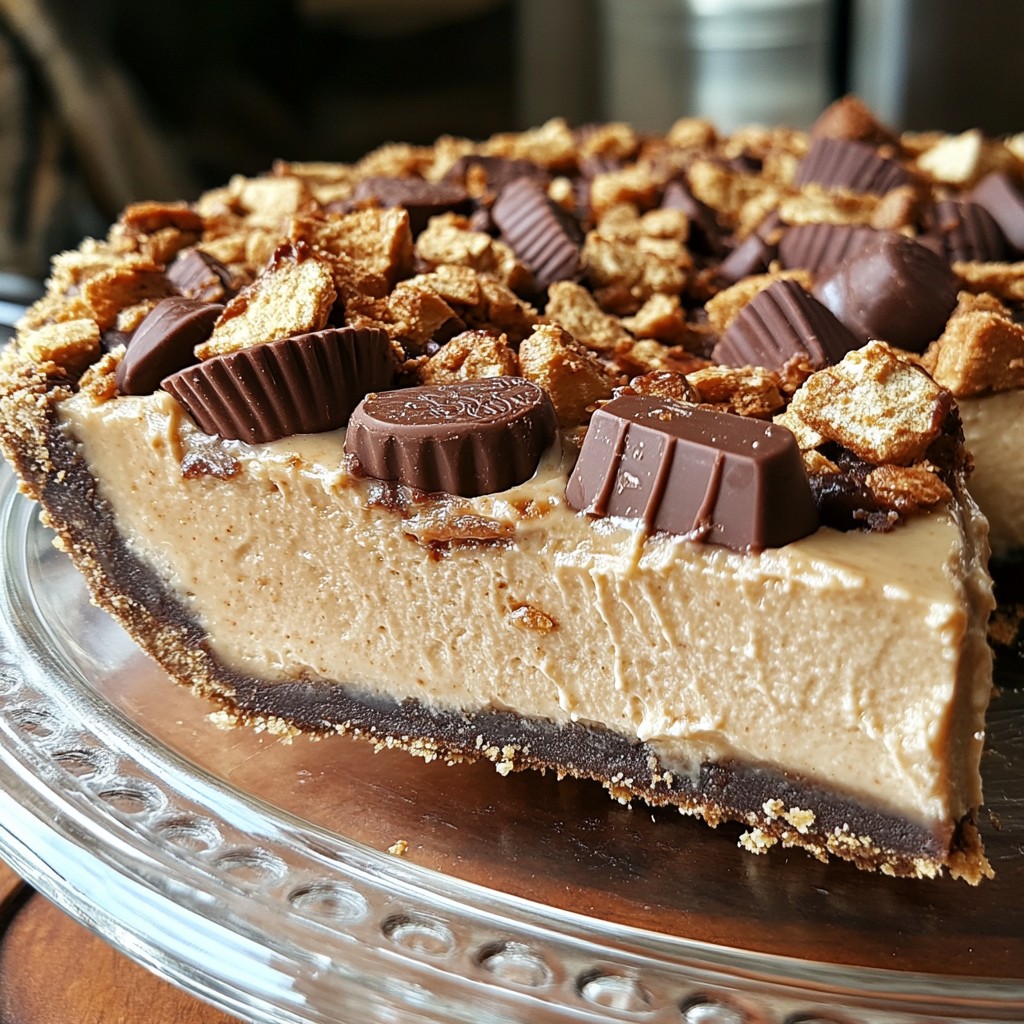
A creamy, dreamy Reese’s Peanut Butter Cup Pie with a crunchy Oreo crust, fluffy peanut butter filling, silky chocolate ganache, and candy bar topping. Perfect for holidays, parties, or anytime you want an irresistible no-bake dessert.
For the Crust:
- 24 Oreo cookies, crushed
- 5 tbsp unsalted butter, melted
For the Filling:
- 1 cup creamy peanut butter
- 8 oz cream cheese, softened
- 1 cup powdered sugar
- 1 tsp vanilla extract
- 1 ½ cups heavy whipping cream
For the Topping:
- 1 cup semi-sweet chocolate chips
- ½ cup heavy whipping cream
- 6–8 Reese’s Peanut Butter Cups, chopped
Tools Needed
- 9-inch pie pan
- Food processor or rolling pin (to crush cookies)
- Mixing bowls
- Electric hand mixer or stand mixer
- Rubber spatula
- Small saucepan
- Whisk
Cooking Instructions
Step 1: Prepare the crust
Crush Oreo cookies into fine crumbs using a food processor or rolling pin. Mix with melted butter until well coated. Press firmly into the bottom of a 9-inch pie pan. Refrigerate while preparing the filling.
Step 2: Make the filling base
In a large mixing bowl, beat peanut butter, softened cream cheese, powdered sugar, and vanilla extract until smooth and creamy.
Step 3: Whip the cream
In a separate bowl, whip heavy cream until stiff peaks form. This ensures a light, mousse-like texture for the filling.
Step 4: Combine filling
Gently fold the whipped cream into the peanut butter mixture with a spatula until no streaks remain. Spread evenly over the chilled crust. Refrigerate for at least 3 hours, or until the filling is firm.
Step 5: Prepare the ganache
In a small saucepan over low heat, warm heavy cream until hot but not boiling. Pour over chocolate chips in a bowl, let sit 1–2 minutes, then whisk until silky smooth.
Step 6: Add the topping
Pour ganache over the peanut butter filling, smoothing it with a spatula. Scatter chopped Reese’s Peanut Butter Cups over the top.
Step 7: Chill and serve
Refrigerate for 30 minutes more before slicing. The pie should be firm, creamy, and layered with chocolatey goodness.
Why You’ll Love This Recipe
No-bake and beginner-friendly
Perfect combination of creamy, crunchy, and chocolatey textures
Crowd-pleaser for holidays, birthdays, or potlucks
Easy to make ahead of time
Customizable with different toppings or cookie crusts
Mistakes to Avoid & Solutions
Mistake 1: Overmixing the whipped cream
Solution: Stop mixing as soon as stiff peaks form to keep the filling airy.
Mistake 2: Not chilling long enough
Solution: Allow a full 3 hours for the filling to set, plus 30 minutes after adding ganache.
Mistake 3: Too hot cream for ganache
Solution: Heat cream until just steaming, then pour over chocolate chips.
Mistake 4: Crust not packed tightly
Solution: Press the crust firmly with the back of a spoon or bottom of a glass.
Mistake 5: Using natural peanut butter
Solution: Use creamy, shelf-stable peanut butter for the best texture.
Serving and Pairing Suggestions
Serve chilled with a dollop of whipped cream on the side.
Pair with a glass of cold milk, hot coffee, or even a latte for balance.
Slice into small wedges for rich after-dinner dessert plates.
Perfect as the centerpiece of a dessert table, buffet, or holiday spread.
Storage and Reheating Tips
Store leftovers in an airtight container in the refrigerator for up to 4 days.
This pie is best served chilled; no reheating needed.
For longer storage, freeze slices individually wrapped in plastic and foil for up to 1 month. Thaw in the refrigerator before serving.
FAQs
1. Can I use crunchy peanut butter instead of creamy?
Yes, but the filling will be less smooth and more textured.
2. Can I make this pie ahead of time?
Absolutely. Make it up to 24 hours in advance and keep chilled until ready to serve.
3. Can I use a different cookie crust?
Yes! Graham crackers or Nutter Butters also work well.
4. What if I don’t have heavy cream?
You can substitute with stabilized whipped topping, but texture will be slightly different.
5. How do I cut clean slices?
Use a sharp knife warmed under hot water, wiping between each cut.
Tips & Tricks
Chill the mixing bowl and beaters before whipping cream for better peaks.
Add a pinch of sea salt to the ganache for a gourmet touch.
Line the pan with parchment circles if you want easier removal of slices.
Double the recipe for a party-sized 13×9-inch version.
Drizzle extra peanut butter over the top before serving for added flair.
Recipe Variations
Chocolate Lover’s Twist: Use double-stuffed Oreos for the crust and dark chocolate ganache for an intense cocoa hit.
Nutty Crunch Version: Stir chopped peanuts into the filling for extra texture.
Mini Pie Bites: Press crust into muffin tins, fill, and top for individual servings.
Frozen Peanut Butter Pie: Skip the ganache, freeze the filling overnight, and serve as an ice-cream style pie.
Caramel Drizzle Version: Add a layer of caramel sauce under the ganache for a sweet, gooey surprise.
Final Thoughts
It’s not just the rich chocolate, or the fluffy peanut butter filling it’s the way everyone’s eyes light up when they see it on the table. For me, the best part is watching my kids sneak Reese’s cups off the topping while pretending they’re “helping.” It has turned into a family ritual, one that makes baking feel less like a task and more like a shared moment of joy.
This pie isn’t about perfection. It’s about indulgence, laughter, and the kind of memories that linger long after the last crumb is gone. Whenever I want a guaranteed smile from my loved ones, this recipe is the one I reach for. It’s a dessert that feels a little bit nostalgic, a little bit luxurious, and completely irresistible.
Rich Reese’s Peanut Butter Cup Pie
Course: DessertDifficulty: Easy8
servings20
minutes3
hoursA creamy, dreamy Reese’s Peanut Butter Cup Pie with a crunchy Oreo crust, fluffy peanut butter filling, silky chocolate ganache, and candy bar topping. Perfect for holidays, parties, or anytime you want an irresistible no-bake dessert.
Ingredients
- For the Crust:
24 Oreo cookies, crushed
5 tbsp unsalted butter, melted
- For the Filling:
1 cup creamy peanut butter
8 oz cream cheese, softened
1 cup powdered sugar
1 tsp vanilla extract
1 ½ cups heavy whipping cream
- For the Topping:
1 cup semi-sweet chocolate chips
½ cup heavy whipping cream
6–8 Reese’s Peanut Butter Cups, chopped
Directions
- Crush Oreo cookies into fine crumbs and mix with melted butter. Press into a 9-inch pie pan and refrigerate.
- Beat peanut butter, cream cheese, powdered sugar, and vanilla until smooth.
- Whip heavy cream until stiff peaks form.
- Fold whipped cream into the peanut butter mixture, spread over crust, and chill 3 hours.
- Heat cream, pour over chocolate chips, and whisk into ganache.
- Spread ganache over filling and top with chopped Reese’s cups.
- Chill 30 minutes more before slicing and serving.